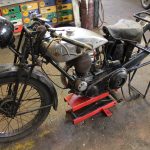
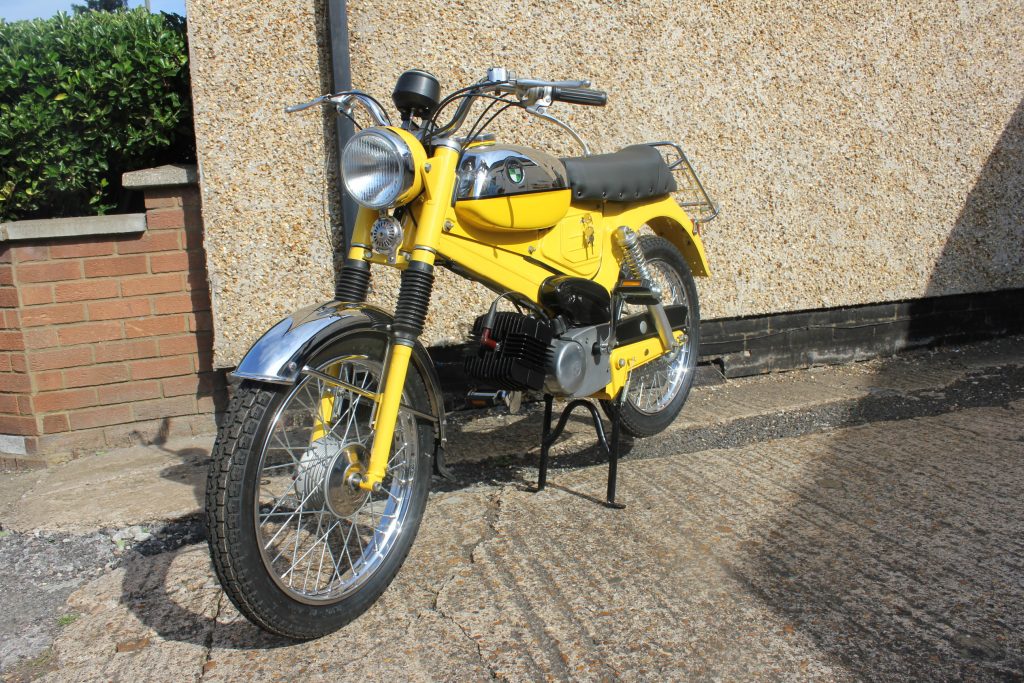
I am going to use this blog as a testament of how a vintage motorcycle can be recommissioned fast and efficiently with plenty of dialogue between the owner and me, you will note from the dates of the to from dialogue through the emails that I am committed in sharing information while I work through the project. You will note with my emails that they are sent after work hours as I do not like to pass the costs on to the owners.
I can kill two birds with one stone by writing a report on the work being carried out and using the report as a blog on the website. By doing it this way I hope to show honesty and efficiency to suit both parties, honesty is confirmed by the speed I report back with what I have completed and the owner can see how fast we work by the dates of my reports contained in the email. As this bike is not a restoration but a recommission, after the machine had been sitting unstarted for at least 40 years in a museum I could do the work in house and hastily, as this will impress the owner and hopefully will generate the attention needed from blog readers to keep work coming in to our company. The emails are as follow and pictures are before and after email conversation.
On 2020-02-28 martin wrote
The Terrot will be arriving at your workshop on Tuesday 3rd March at
about 1pm. I will be there as well. Hope this is OK with you
On 4 Mar 2020 terry wrote
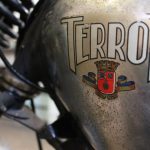
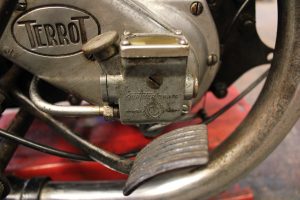
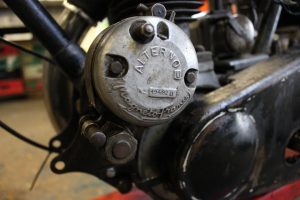
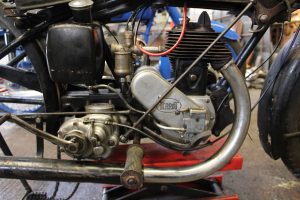
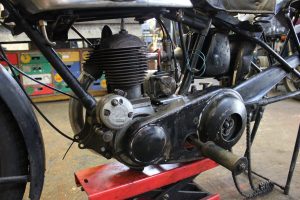
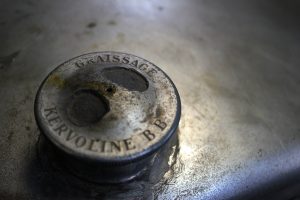
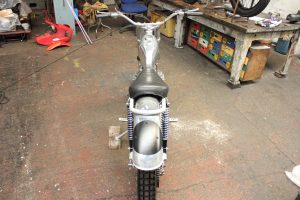
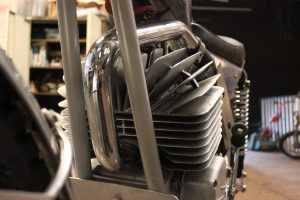
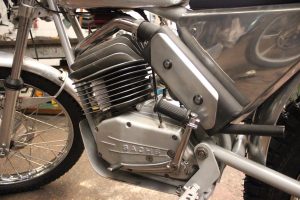
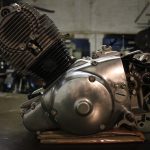
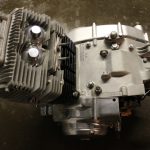
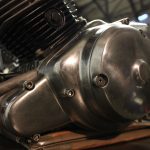
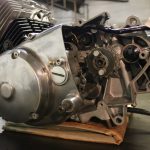
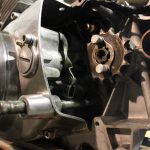
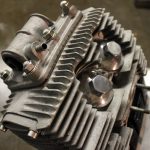
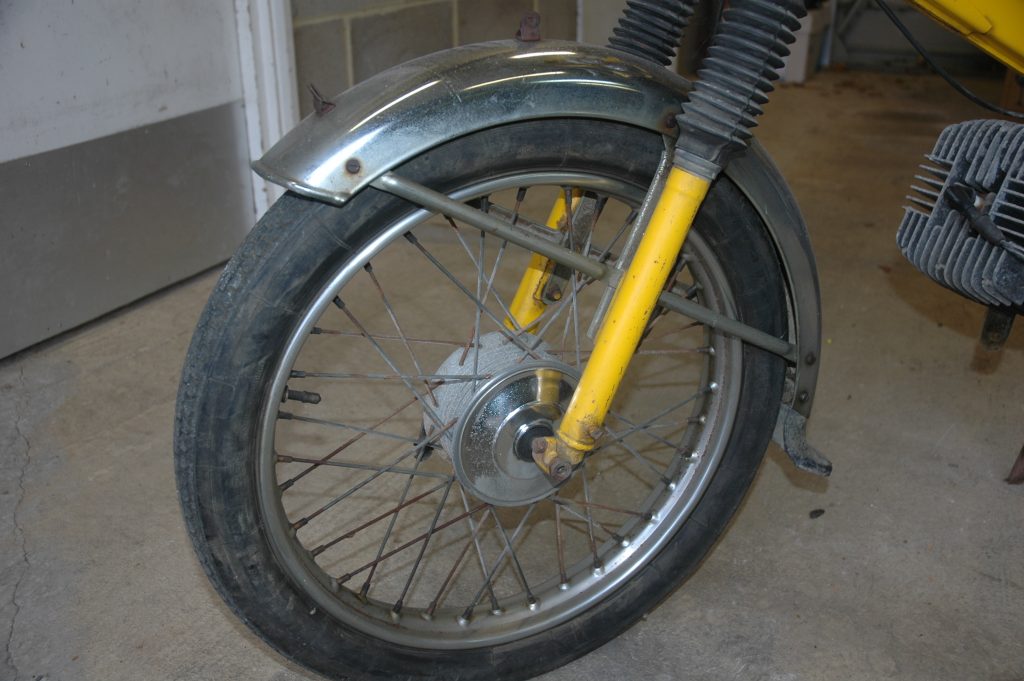
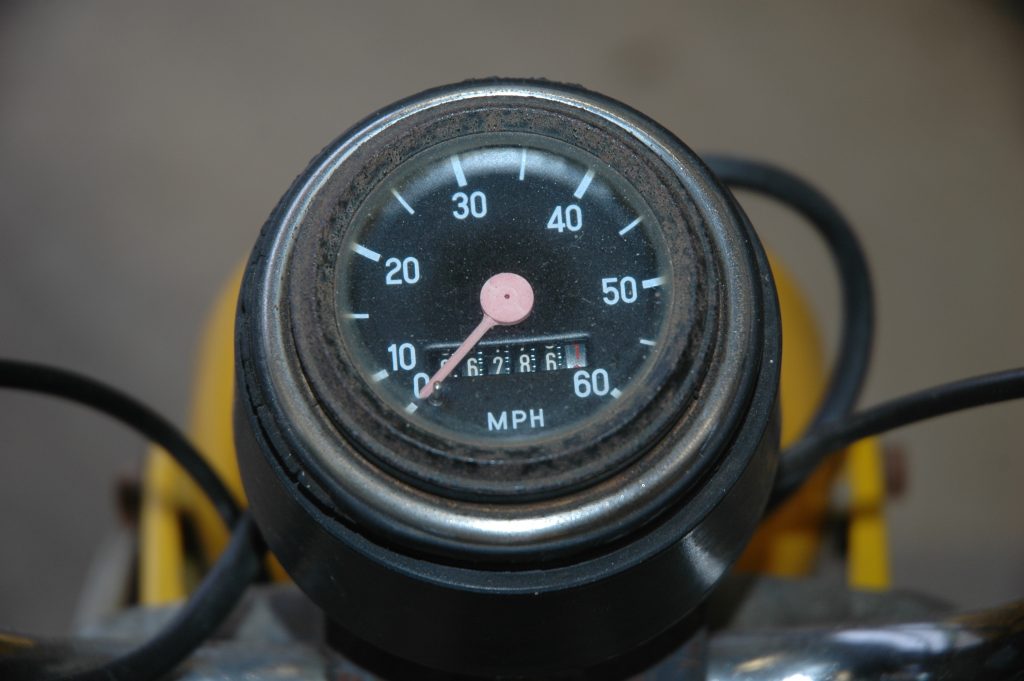
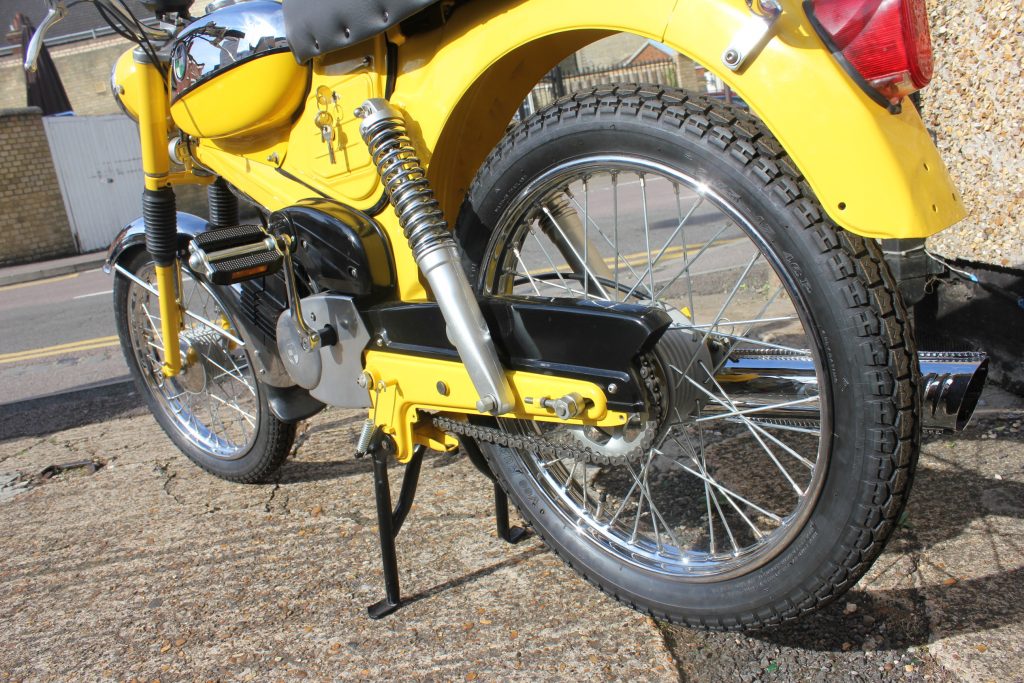
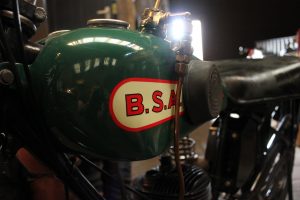
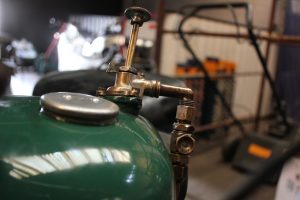
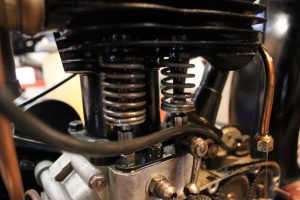
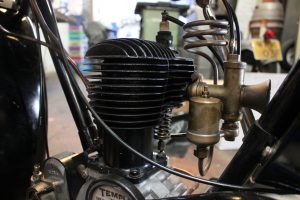
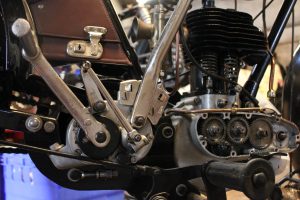
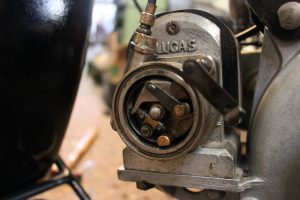
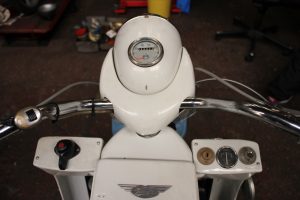
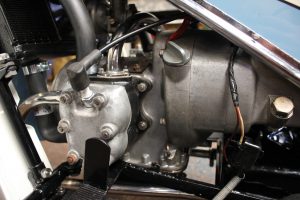
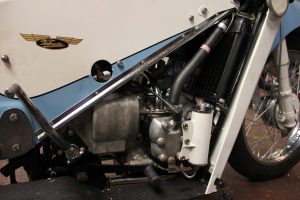
you have bought a gooden. i have removed the barrel and measured the piston gaps on the rings and found them to have over 2mm gap. i have made a set of new rings and an exhaust valve guide that was wildly out of tolerance by at least 1mm, this is the worst i have seen and the bike would never start with these two anomalies . all has been fitted and put back on the bike. the magneto was solid with melted shellac from the magneto windings that had been overdosed , way too much had been put on the windings and over the years with a lot of hot weather it melted the shellac and locked up the workings. I took it to david in letchworth as this is where i live who remagnetized it and , boy it gives a punch now, i dont know much about electrics but he said that 17,000 volts was good to go. The tank is nearly cleaned out and i am going to do the ignition timing tmoro and make up the missing cables and replace some knackered ones. can i use your terrot in a blog with no names or reg.
On 2020-03-04 martin wrote
Excellent news and thanks for the speedy service..!
Feel free to blog the Terrot or whatever you want really.
I’ll get some tyres that will look right
On 5 Mar 2020 terry wrote
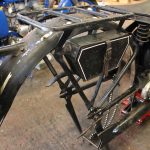
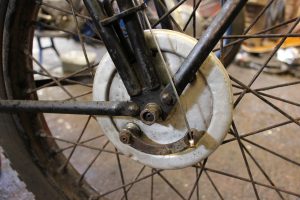
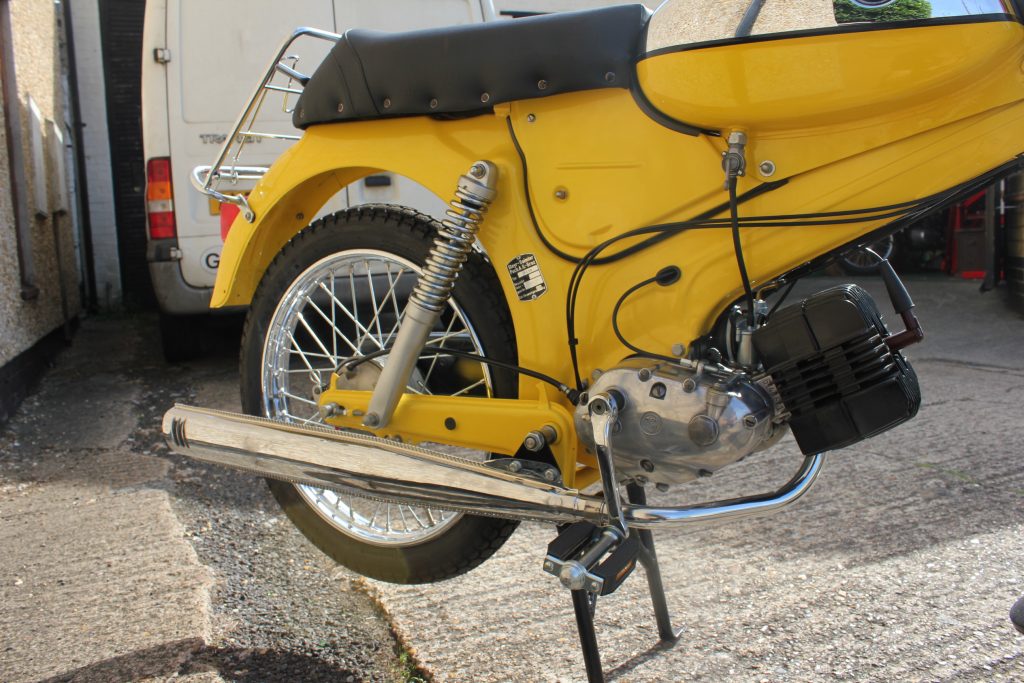
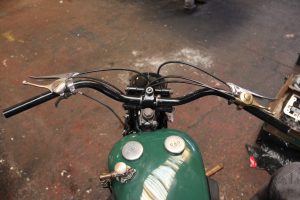
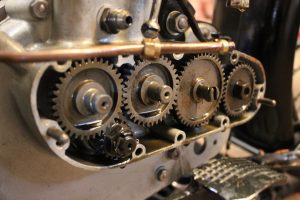
throttle cable modified to fit and operate correctly as well as the choke cable which you will find has to work properly on this age of motorcycle. The clutch has been cleaned and the loose screws that came out with the clutch springs have been attended to. The tank is really clean inside. I have removed the petrol tap and unblocked it of its old fuel residue as there was no way it was going to work. the carb has been stripped and cleaned and adjusted to take the new cable set up. New tank mounting rubbers have been made. The dynamo now operates as it should but i need to check the output voltage. the primary chaincase now has a new spacer in place that was missing. The petrol tank crossover pipe was jammed up with shxxt and the two union nuts had splits in them due to age and over tightening .The tube has been cleaned out and two new nuts and two new olives have been replaced. On the timing side of the engine there is a rubber washer that was missing or it totally eroded away, this has been replaced. There are only a few jobs to be attended to such as the front brake with no cable and and when i operate the brake plate lever with my hand there is absolutely no braking at all. The oil tank bracket needs repairing. The forks are really baggy and unresponsive and need tightening up. The rear sprocket is the only sprocket that is knackered so i will rework it. Your model terrot has not got a hole in the cylinder head to stick a rod down it to find top dead center so i can set the ignition timing so with the timing cover removed i counted the teeth on the timing gear and found it to be 40 teeth so i got the engine on compression stroke and guessed where top dead center was and a hole drilled it the timing gear seemed to point due north, i divided the number of teeth by 360 degrees and found that one tooth of displacement was equal to 9 degrees. I assumed that your bike being a 250 cc side valve would have an advance spark of about 36 degrees before top dead center with the advance and retard lever in the fully advanced position and the points in the magneto just opening to give the spark required to set things in motion. The fuel tank was replenished with new fuel and a few kicks showed a few pops but nothing giving permanent life , so we are on the right track. I will keep you informed.
On 2020-03-05 martin wrote
Top job..! It sounds like she will be up and running very soon. I have
ordered tyres and inner tubes, to be delivered directly to you.
Thanks for the daily updates
on 2020-03-05 terry wrote
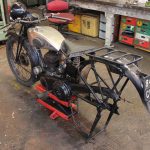
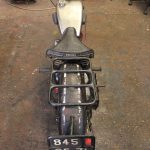
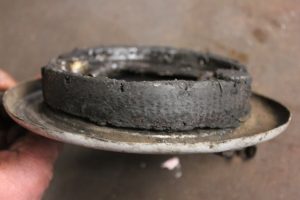
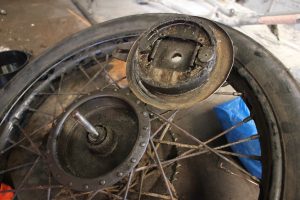
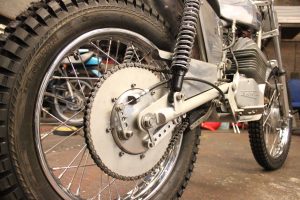
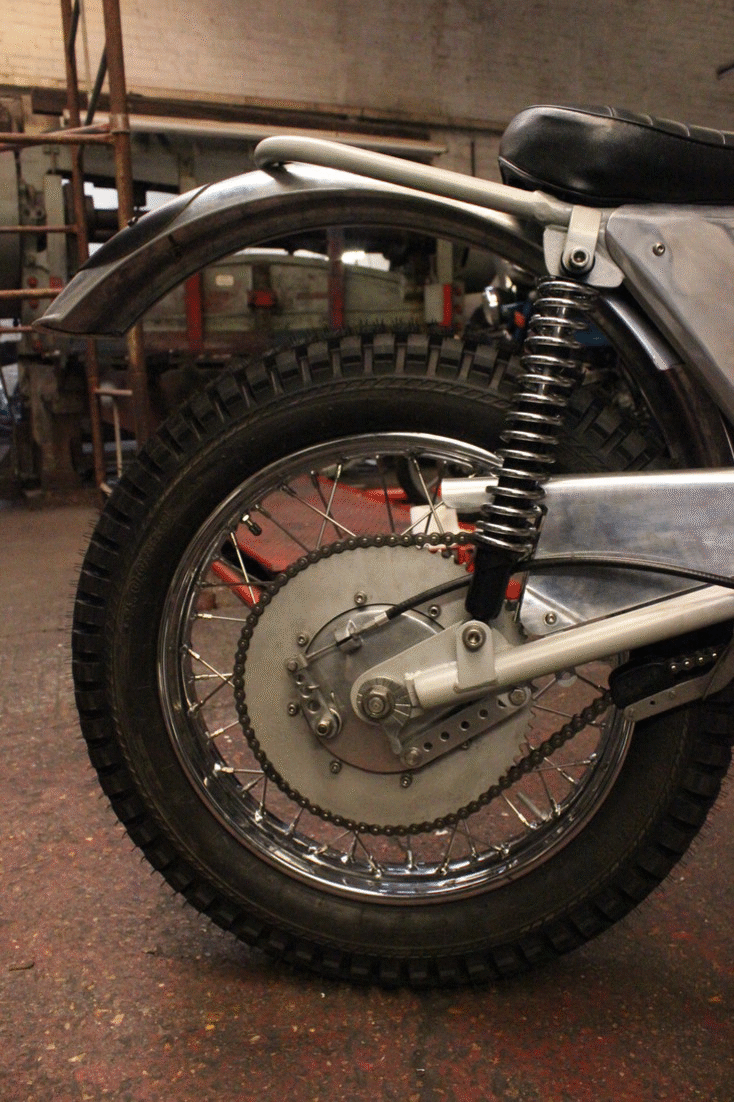
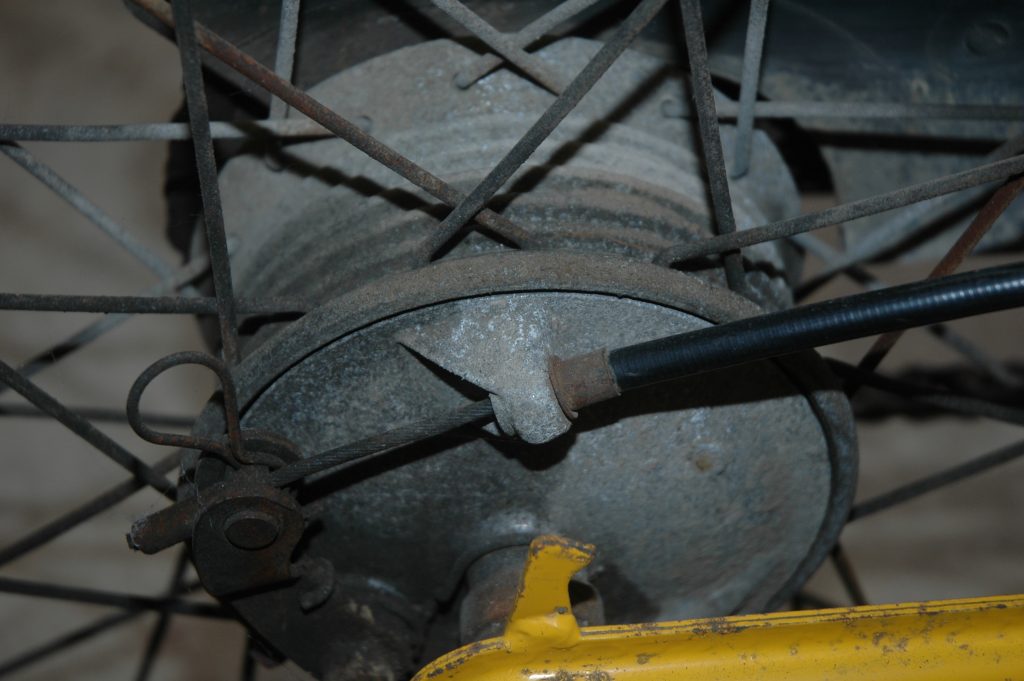
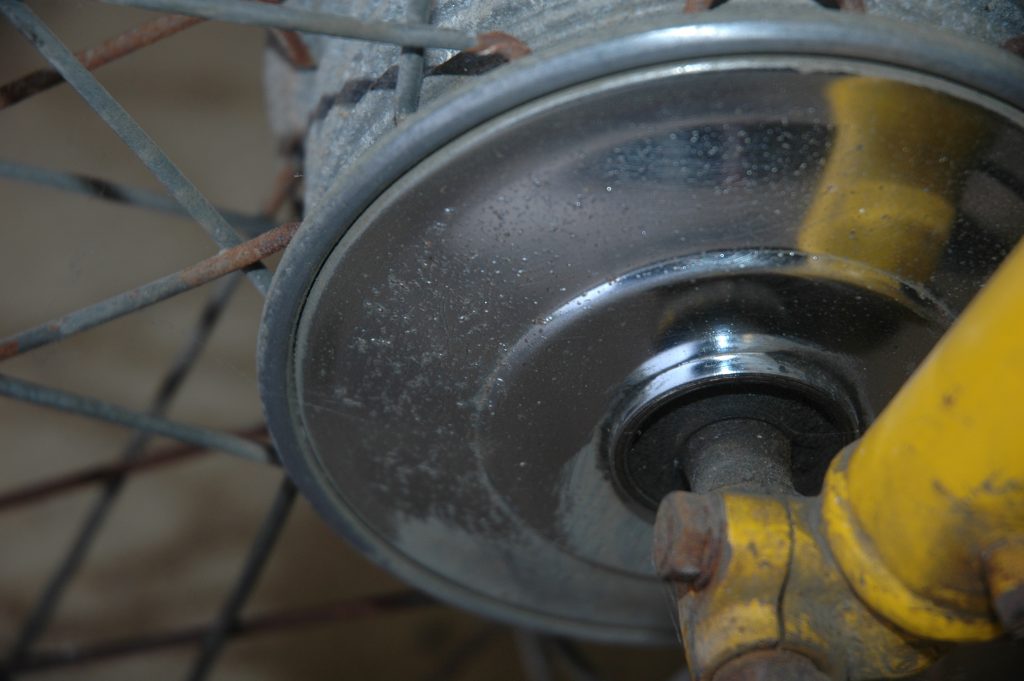
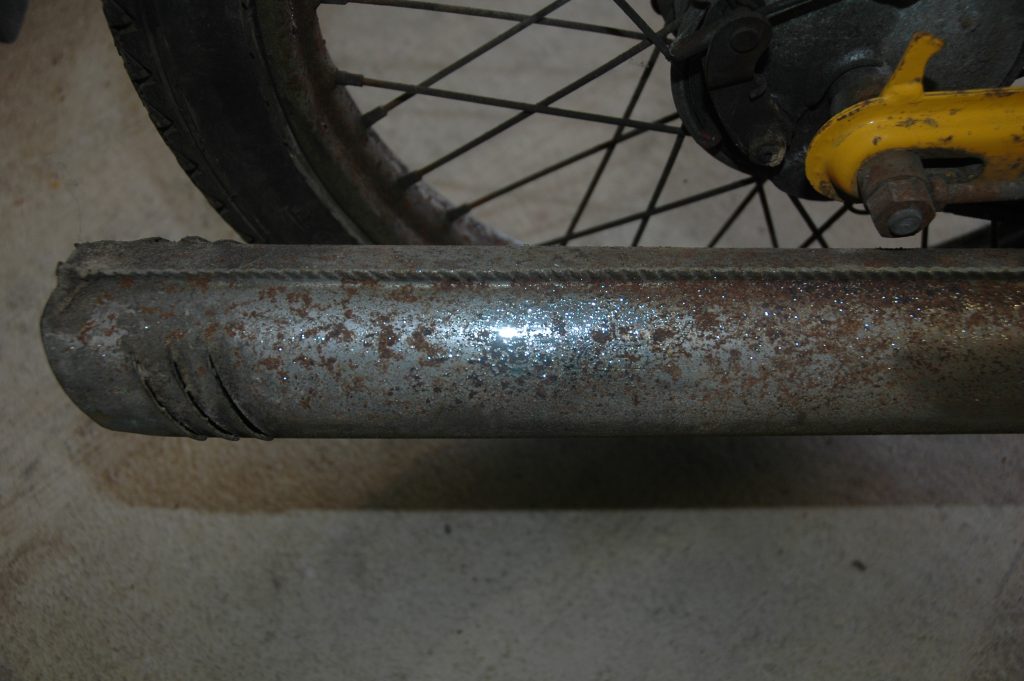
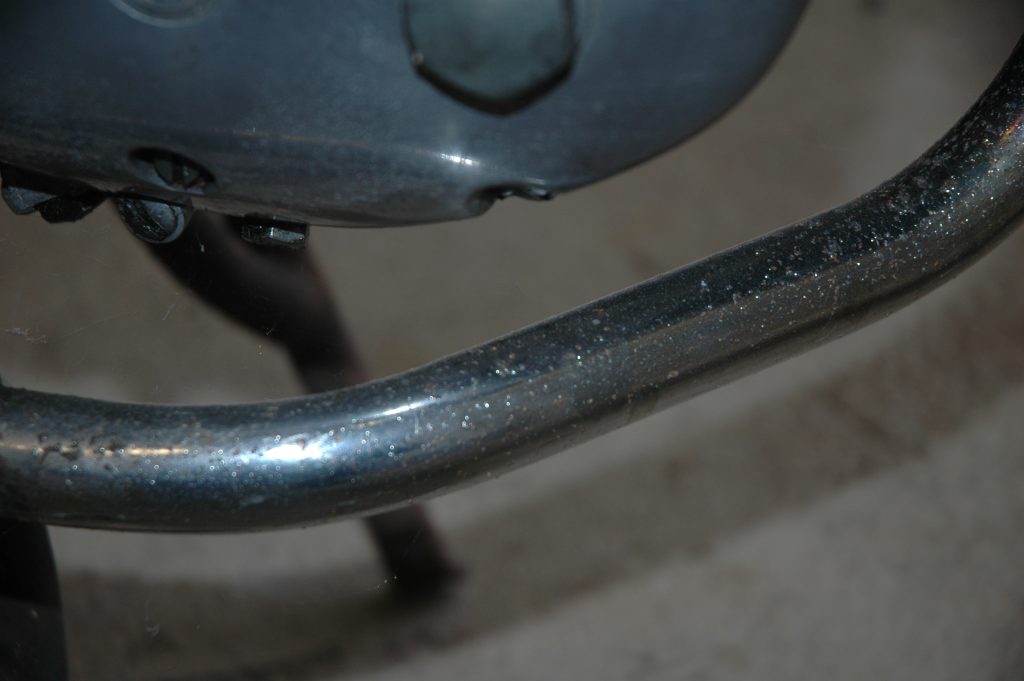
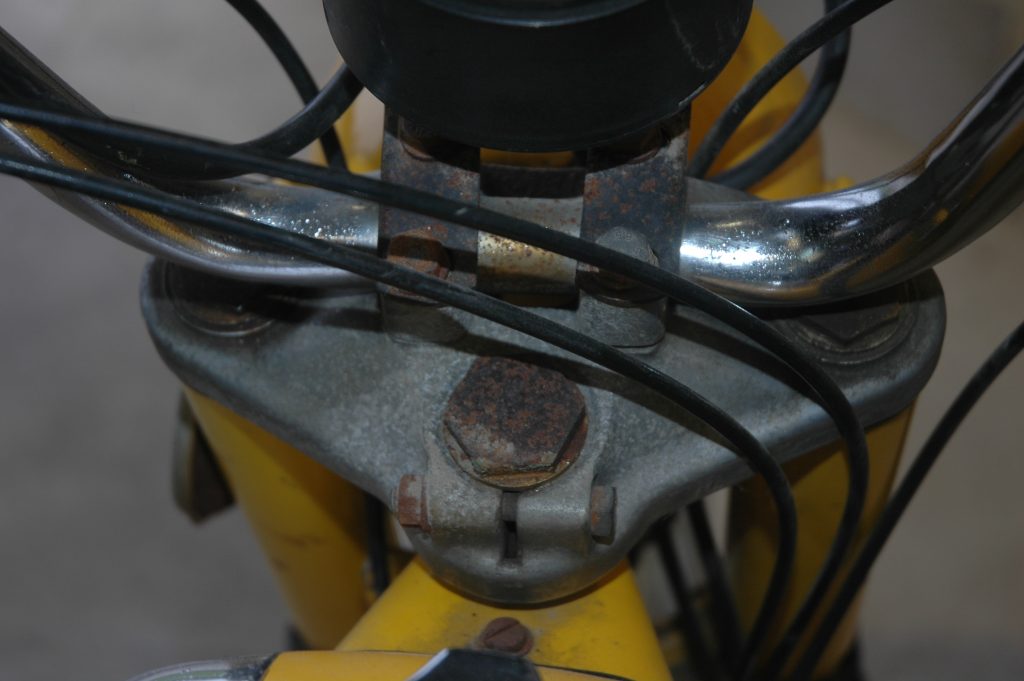
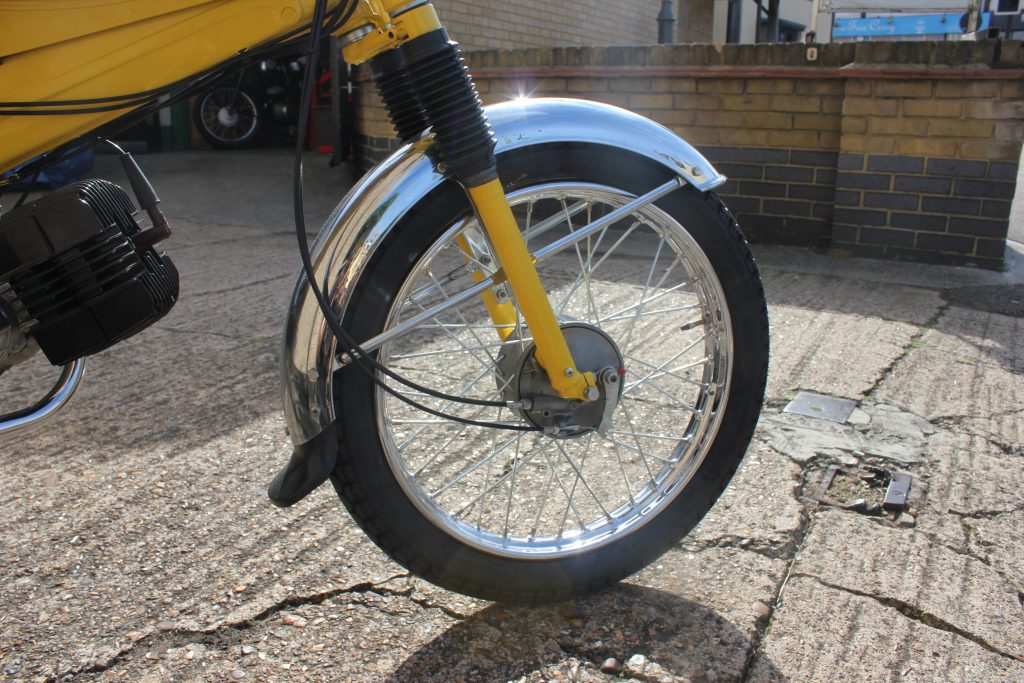
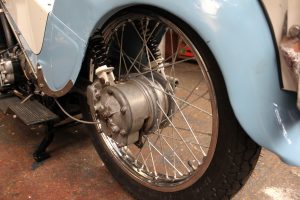
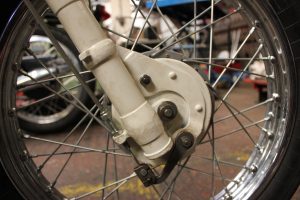
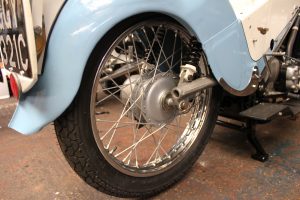
Today in between a host of other work i fitted a new old stock clutch cable and a new old stock front brake cable. The front brake i feared had no operation due to pad wear but on removing the front wheel i found that there were no shoes fitted so miracle upon miracle i fitted my spare EMC split single shoes as they are 130mm diameter when fitted to your brake plate and the brake drum happened to be the same bore diameter, pics to follow when i drop the wheel out to fit the tyres. By the way, the original brake shoes were crap as i have done terrot brake relines before. The rear stand that had been poorly welded gave up the ghost while i gave her a couple of kicks to try and start her. Carburation is good and spark is cracking so it must be a timing issue. I fear that my timing was not good enough regarding the tooth counting. Here is what i did and it was an old trick that my grand father taught me as he was an avid motorcyclist until he bought a Datsun sunny in the 1970s and kissed goodbye to 60 years of riding bikes. First we get some fairy liquid and water in a cup, we then remove the spark plug and then we look at the valves so we know when we are on compression stroke. We then wipe some of our liquid on top of the spark plug hole and turn the engine over by its rear wheel very very slowly and watch the bubble grow bigger until it pops. We now apply some more liquid until it pops again. We now know that the engine is in its compression phase and we need to keep going until we see the bubble starting to retract. Back the wheel up again and inch forward again until we see the bubble at its biggest, hey presto, Top dead center. We now need a reference point to work from. On your particular model we have an aluminium fly wheel at the left hand end of the crank that friction drives the lighting dynamo. We can mark this wheel with a pen mark and tape a bit of paper with a line drawn on it to the primary chain cover to coincide with the line on the flywheel. We can now turn the rear wheel backward about 45 degrees and inch it forward to about 35 degrees before top dead center Now set the points so they are just opening on full advance position, put the timing gear cover back on and set the choke lever to to fully closed and the throttle lever to fully closed and first kick chug chug chug. She starts all the time with no issues. A big smile on my face when this happens. New rubber washers were fitted to the petrol tank. The forks have been adjusted but there is a little wear in the fork bushes but this will leave a little more room for grease. Tomoro we will fix the rear stand and drop the rear wheel out so we can see what we can do about the rear sprocket and restore that bracket that holds the oil tank to the frame and in turn holds the rear mudguard steady. I will have a shot at fitting the wiring to the dynamo but i dont want to rack up any undue costs messing about with things that can be done by a host of friends over a few beers in the garage.
On 2020-03-06 20:31 martin wrote
Terrot tyres will come direct to you
Tubes will come to me, so I will either post them on to you or nip
down with them.
Don’t bother with the wiring, it’s something I would like to do myself.
What’s the oil like?
Looking forward to seeing it running..!
2020-03-06 terry said
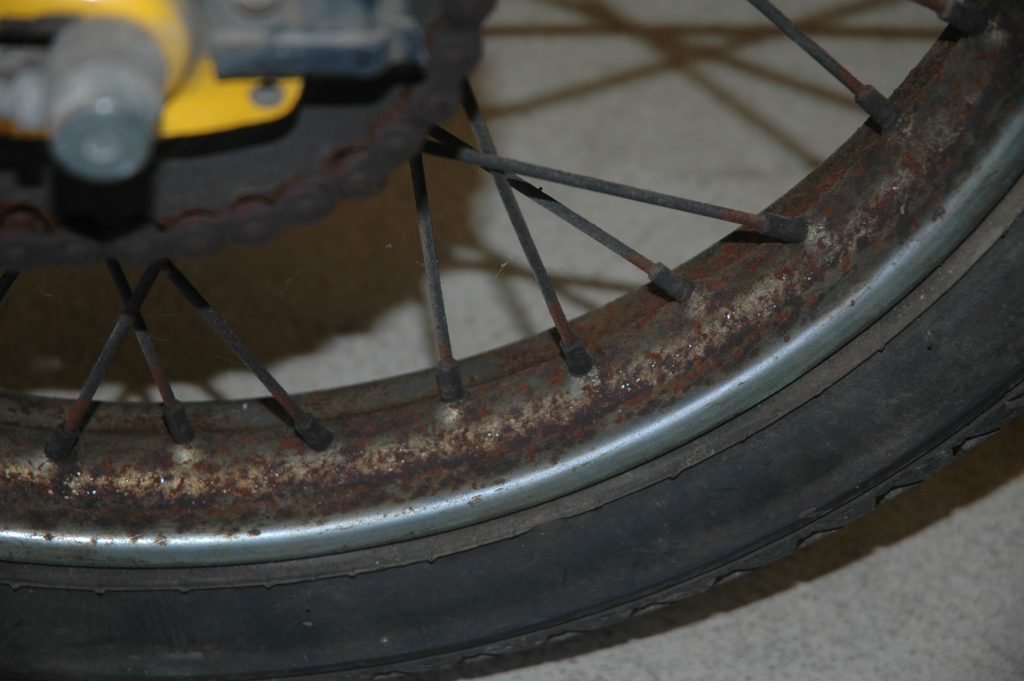
The latest update is that the rear stand has been done professionally by my son who works for me. The oil tank mounting bracket has been repaired and the rear mudguard bolt has been replaced with the missing one. The clutch cable now works. I decided to jump the gun and remove the rear wheel and remove the tyre ready for the quick tyre change but i thought i would have a look at the rear brake, pics to follow as the condition was laughable but they have been resurected and the original linings are very good and will work fine. The forks have had the split pins fitted to the castle nuts so that puts them to bed. All that needs doing is the tyre change. cheers terry
On 2020-03-06 martin wrote
Hi Terry,
Terrot tyres will come direct to you
Tubes will come to me, so I will either post them on to you or nip
down with them.
Don’t bother with the wiring, it’s something I would like to do myself.
What’s the oil like?
Looking forward to seeing it running..!
on 2020-03-06 terry said
Hi Martin , you ask what is the oil like. Other than it is a slippery lubricating substance and there is plenty of it in the crankcase and your bike smokes like fuck, The oil is ok. Your bike runs on a non scavange system, there is one pipe that comes from your oil tank and this is fed to the engine and is burnt off with the fuel. Eco friendly honda and testla eat your hearts out. Top up with Halfords 20/ 50 classic oil.
on 2020-03-07 terry said
I am not sure if i responded to the question of what is the oil like ?. your bike runs on a lean non green total loss system. There is only one pipe that comes out of the oil tank. This is a good pointer that it only goes one way. If there were two pipes one of them would be the return pipe from the engine. The single feed pipe feeds the oil pump that can be adjusted via a small round dial with numbers on it that roughly correspond to a certain amount of drips for a given amount of time. This system is called the total loss system. The oil is burnt up with the fuel. This condition causes a certain amount of combustion smoke. The dial when turned to one of the lower numbers will produce less smoke. We need to know that the engine is being lubed so we set the number at say 6 and leave the machine running on idle until it gets hot. On side valve engines it only takes a short time before the workings get up to temperature. What i will look for on acceleration is a slight mist of burning oil, not a fog. If a fog occurs we will need to dial down on the numbers to give a slight mist on acceleration. Halfords 20/50 will be needed for your Terrot. Running the bike with a lot of smoke will eventually cause it to miss fire due to an oiled plug. It can also cause a certain amount of wet sumping which is a bugger on the Terrot to get rid of as there is no drain plug in the sump. The oiling will be set up to give optimum performance before you collect her. cheers terry
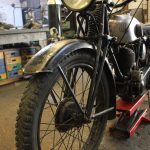
on 2020-03-10 terry said
Hi Martin tires came in today. I have fitted them with heavy duty dunlopair inner tubes as the inside of your rims were a little rusty, we have removed as much live rust as possible to give a smooth finish for the tire to bead onto the rim. I have also fitted to the front rim a heavy duty rim tape. The reason for me side stepping your inner tube delivery is that new tubes are not as heavy duty as the ones i had in stock. I look forward to receiving the inner tubes as replacements for a more modern bike. I am going to do a trial start tmoro and see how she behaves.
on 2020-03-11 martin said
Hope the Terrot starts and runs ok. If she runs ok, perhaps I could collect it one day next week and settle up with you. Looking forward to seeing and hearing it ..!!
on 11 Mar 2020 terry said
Martin i am doing a test run this saturday and will report back.
on 2020-03-15 terry said
I took the terrot to the farm where i keep my car and gave her a run. she starts so easily but smoked like a bastard, the farmer said when i was pulling away it was like the startup of our local traction engine rally. I am going to have to educate myself on getting the sump clear of oil before i can put the pump feed on. if you dont get the starting procedure right it will give you a good kick back as this proves the compression and rings are top notch. give me a couple more days to try and get rid of the oil and the pump set up.
On 24 Mar 2020 terry wrote
i showed your pickup man how easy it is to start and how critical the lever positions were. First tickle the carb. The top right lever is the choke lever. On starting this lever must be pushed all the way away from you and the lower lever is the throttle, this should be in line with the handle bar. Pull the lever that operates the valve lifter and kick the engine over two times gently if you are on the rear stand, there is another lever on the left bar , this is the advance retard lever and this should be set so the cable is in tension , ie all the way anticlockwise. If she dosnt start on the first kick try ticling the carb again and replicate the above. She will smoke a bit as there is oil in the sump that still needs burning off but this oil is still lubricating the inner workings without the best and loyde oil drip feed on. I would suggest running the bike until she starts not to smoke as much as she was, keep an eye on this as no smoke at all is not good for the new piston rings. Get your self armed with a tin of halfords classic oil and fill the oil tank up and set the numbered dial ring on the pump to number 6 and see if she smokes a lot. If she is still smokey turn the dial down to 5 and run for a minute and look for smoke. after setting the dial for a couple of mins you will find she will only give off a smokey haze, not a fog on moderate acceleration. She is a lovely bike.
On 2020-03-24 23:10 martin wrote
Thankyou for your info re. Starting and the oiling. I think she is so
very cool..!! And I wonder if she could tell a few tales, perhaps a
member of the French resistance?
Did you take photos for your blog and website? If not I will send you some
Thanks for your work in the recommissioning.
On 2020-03-25 terry wrote
When i saw her on the back of the flat bed for some reason the whole
bike screamed at being a v twin. It truly is a great bike and i must
say i am a little envious. We have hopefully got some pics.
On 2020-03-27 terry said
by the way check the tyre pressures as they will be up bigtime to bed the beading onto the rims. If there is any chance in the future of dropping off the new inner tubes that you bought to replace the ones i put in that would be great.

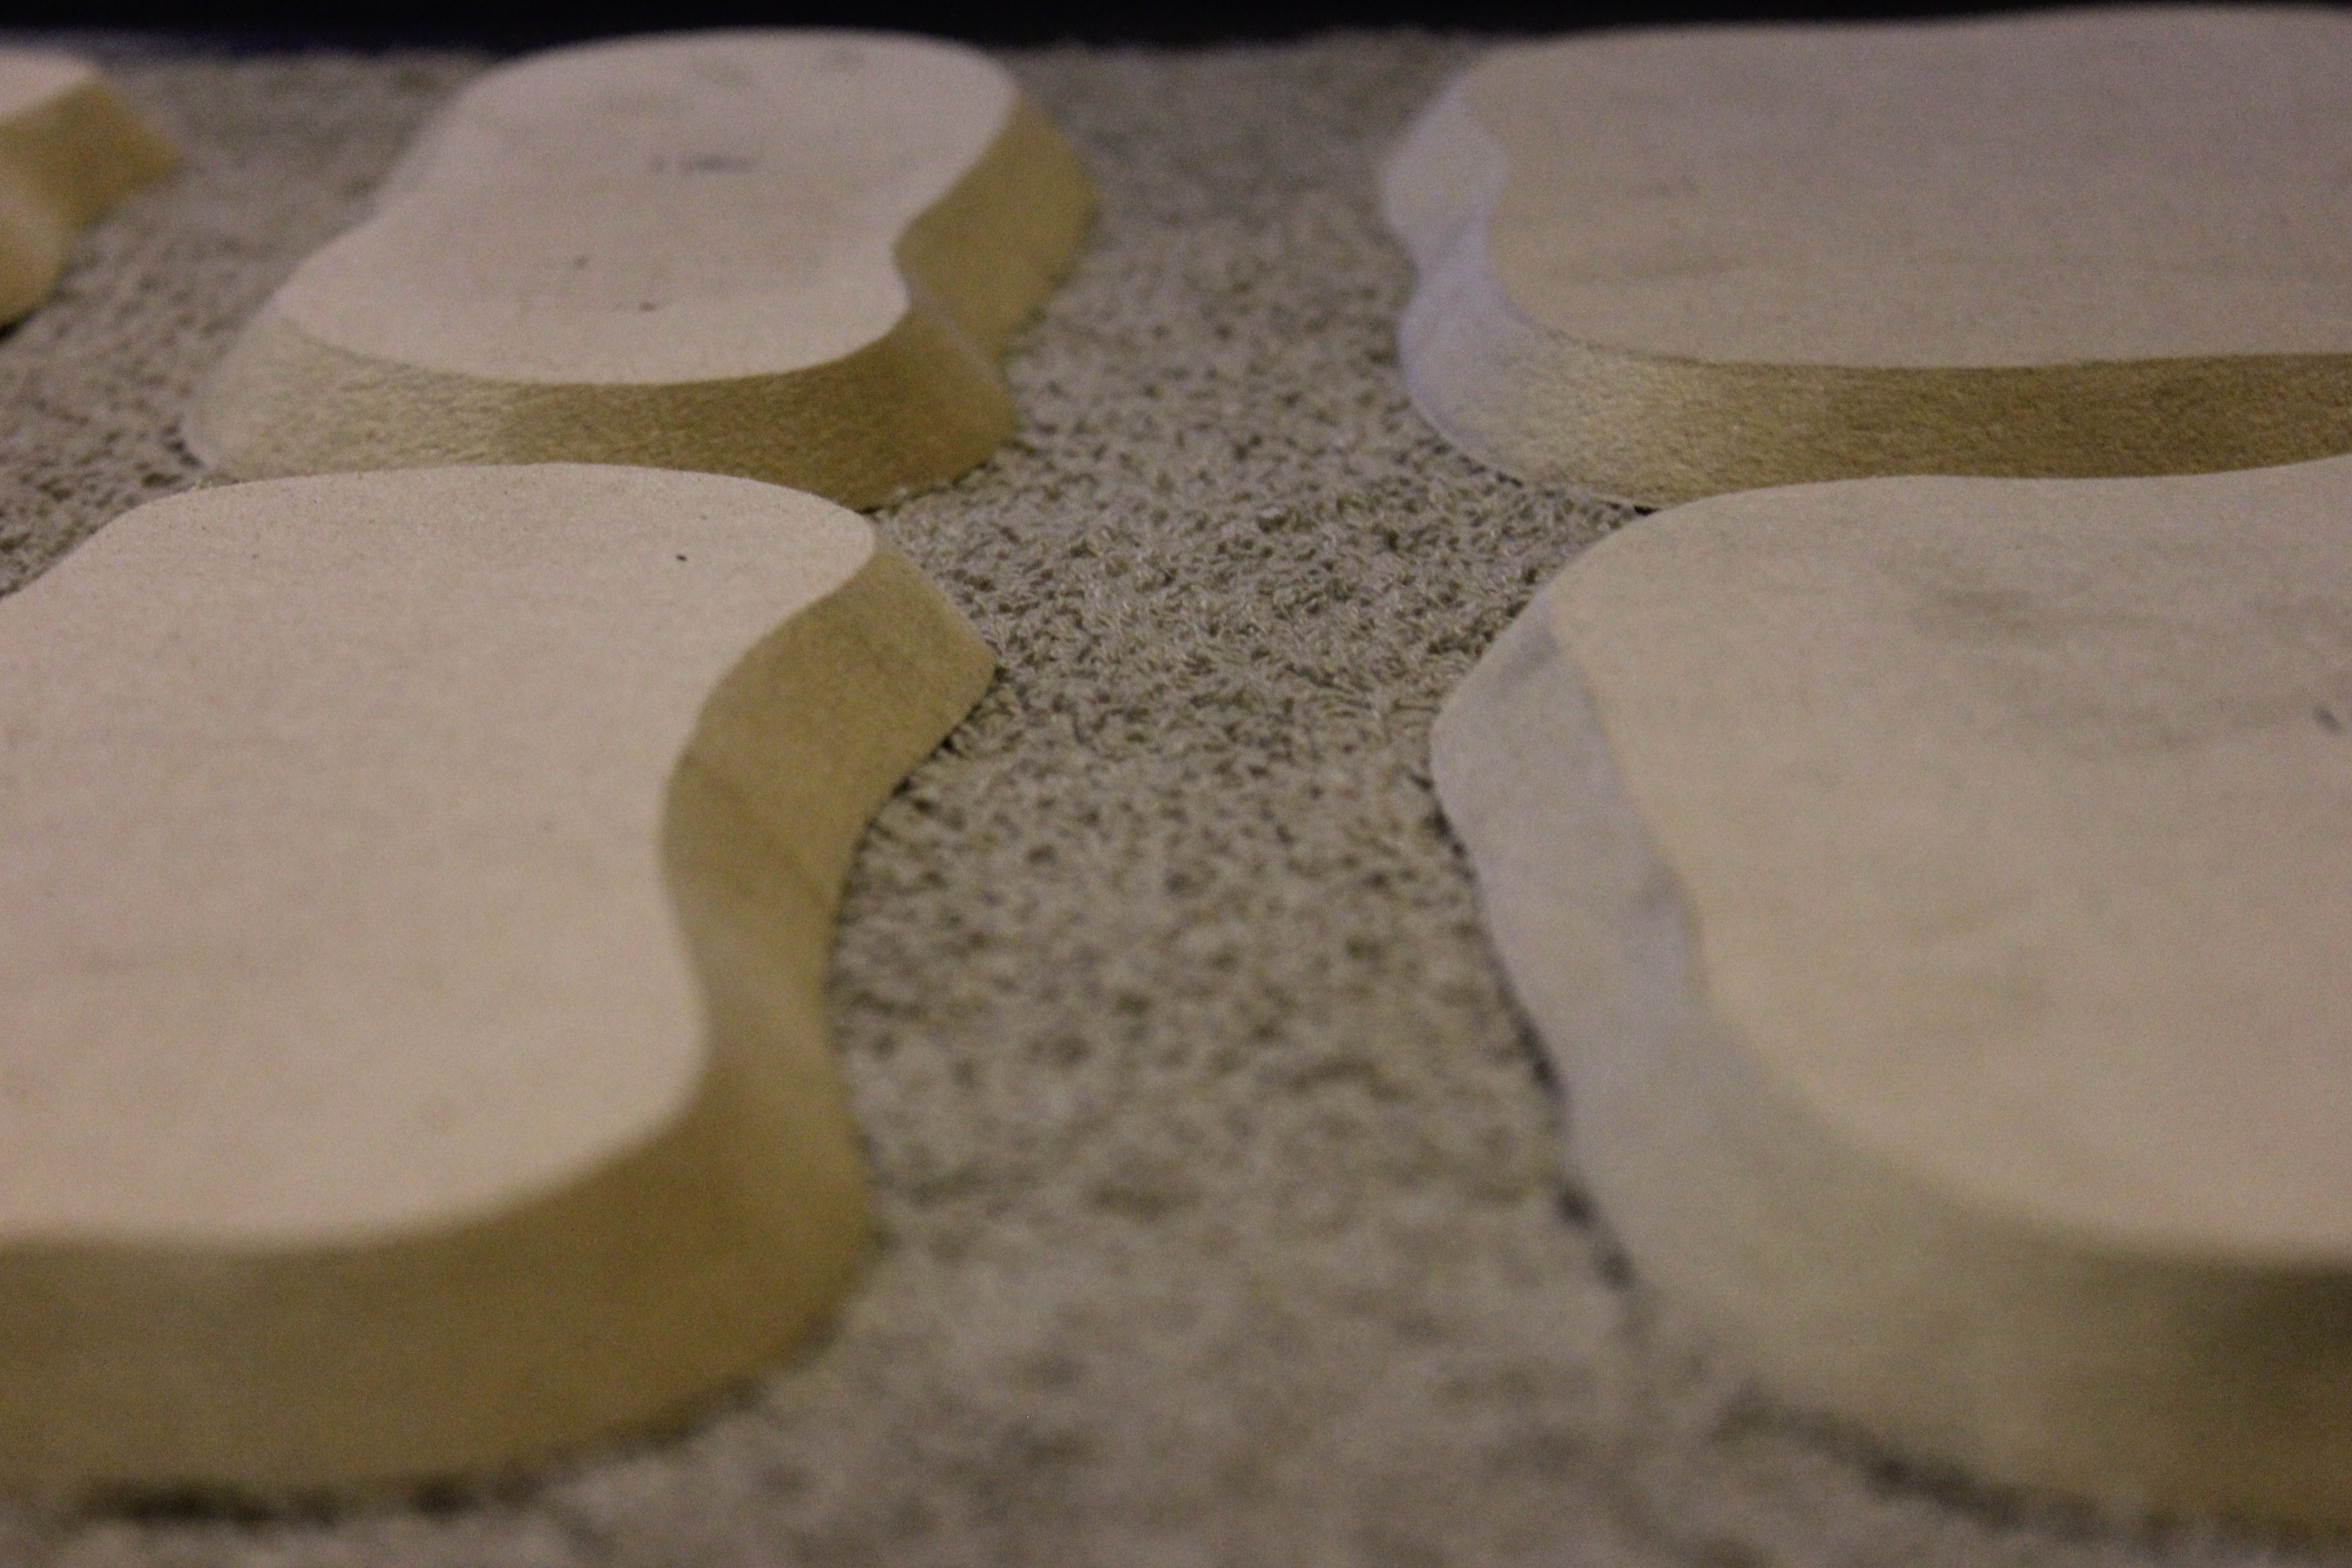
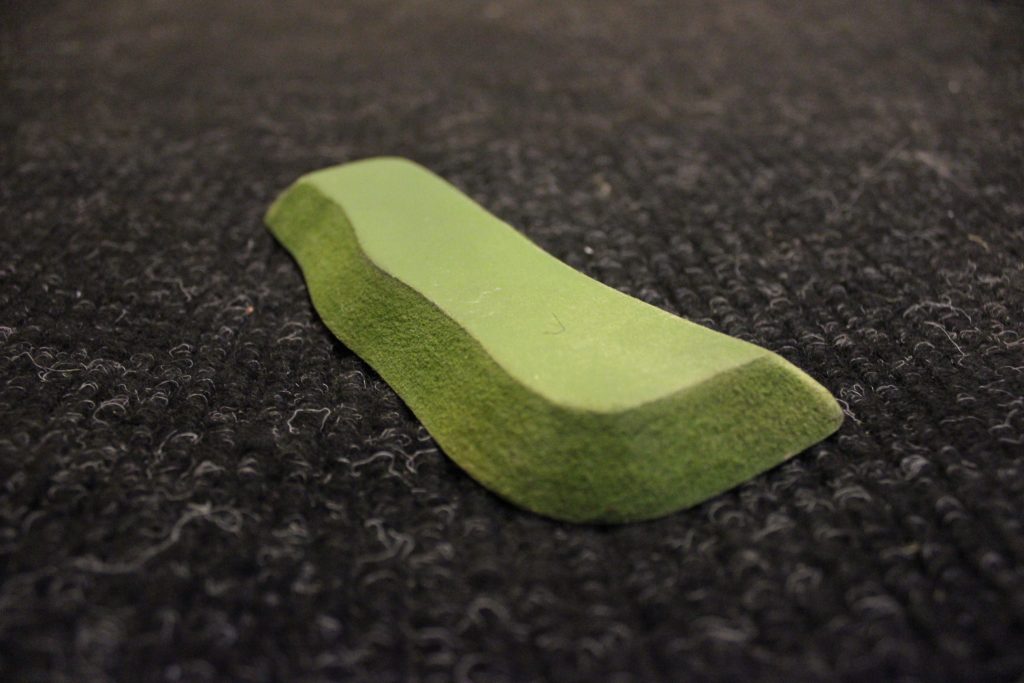
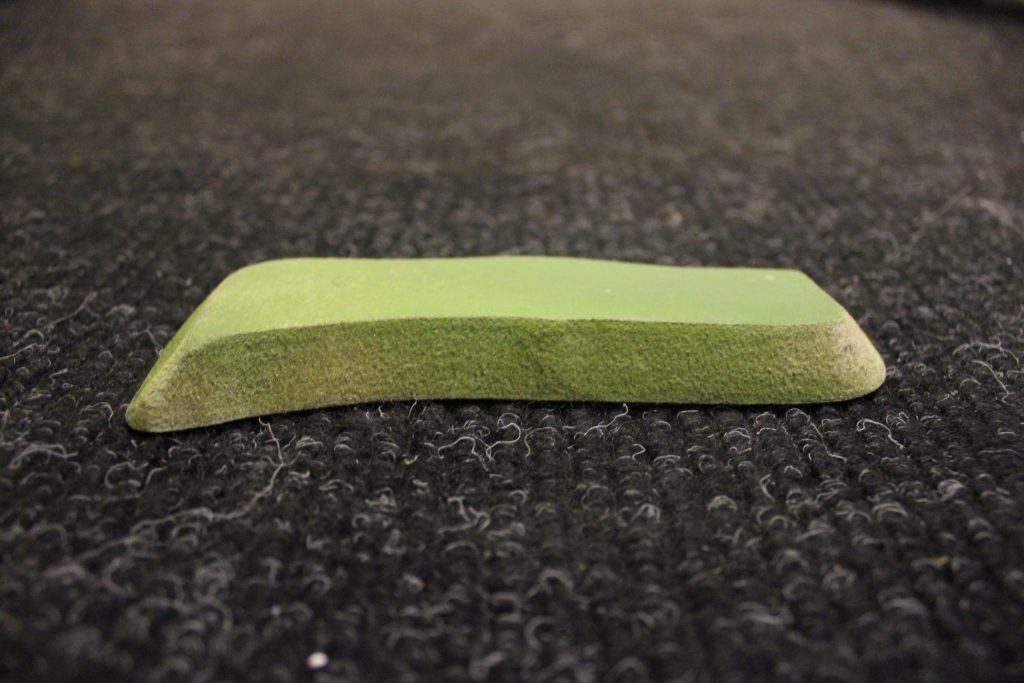
Someone came into the workshop inquiring about diorama platforms also know as figurine bases. He wanted us to supply him with some so we first researched for a manufacturer as it is something quite easy to mass produce, bringing there cost down below our competing one.
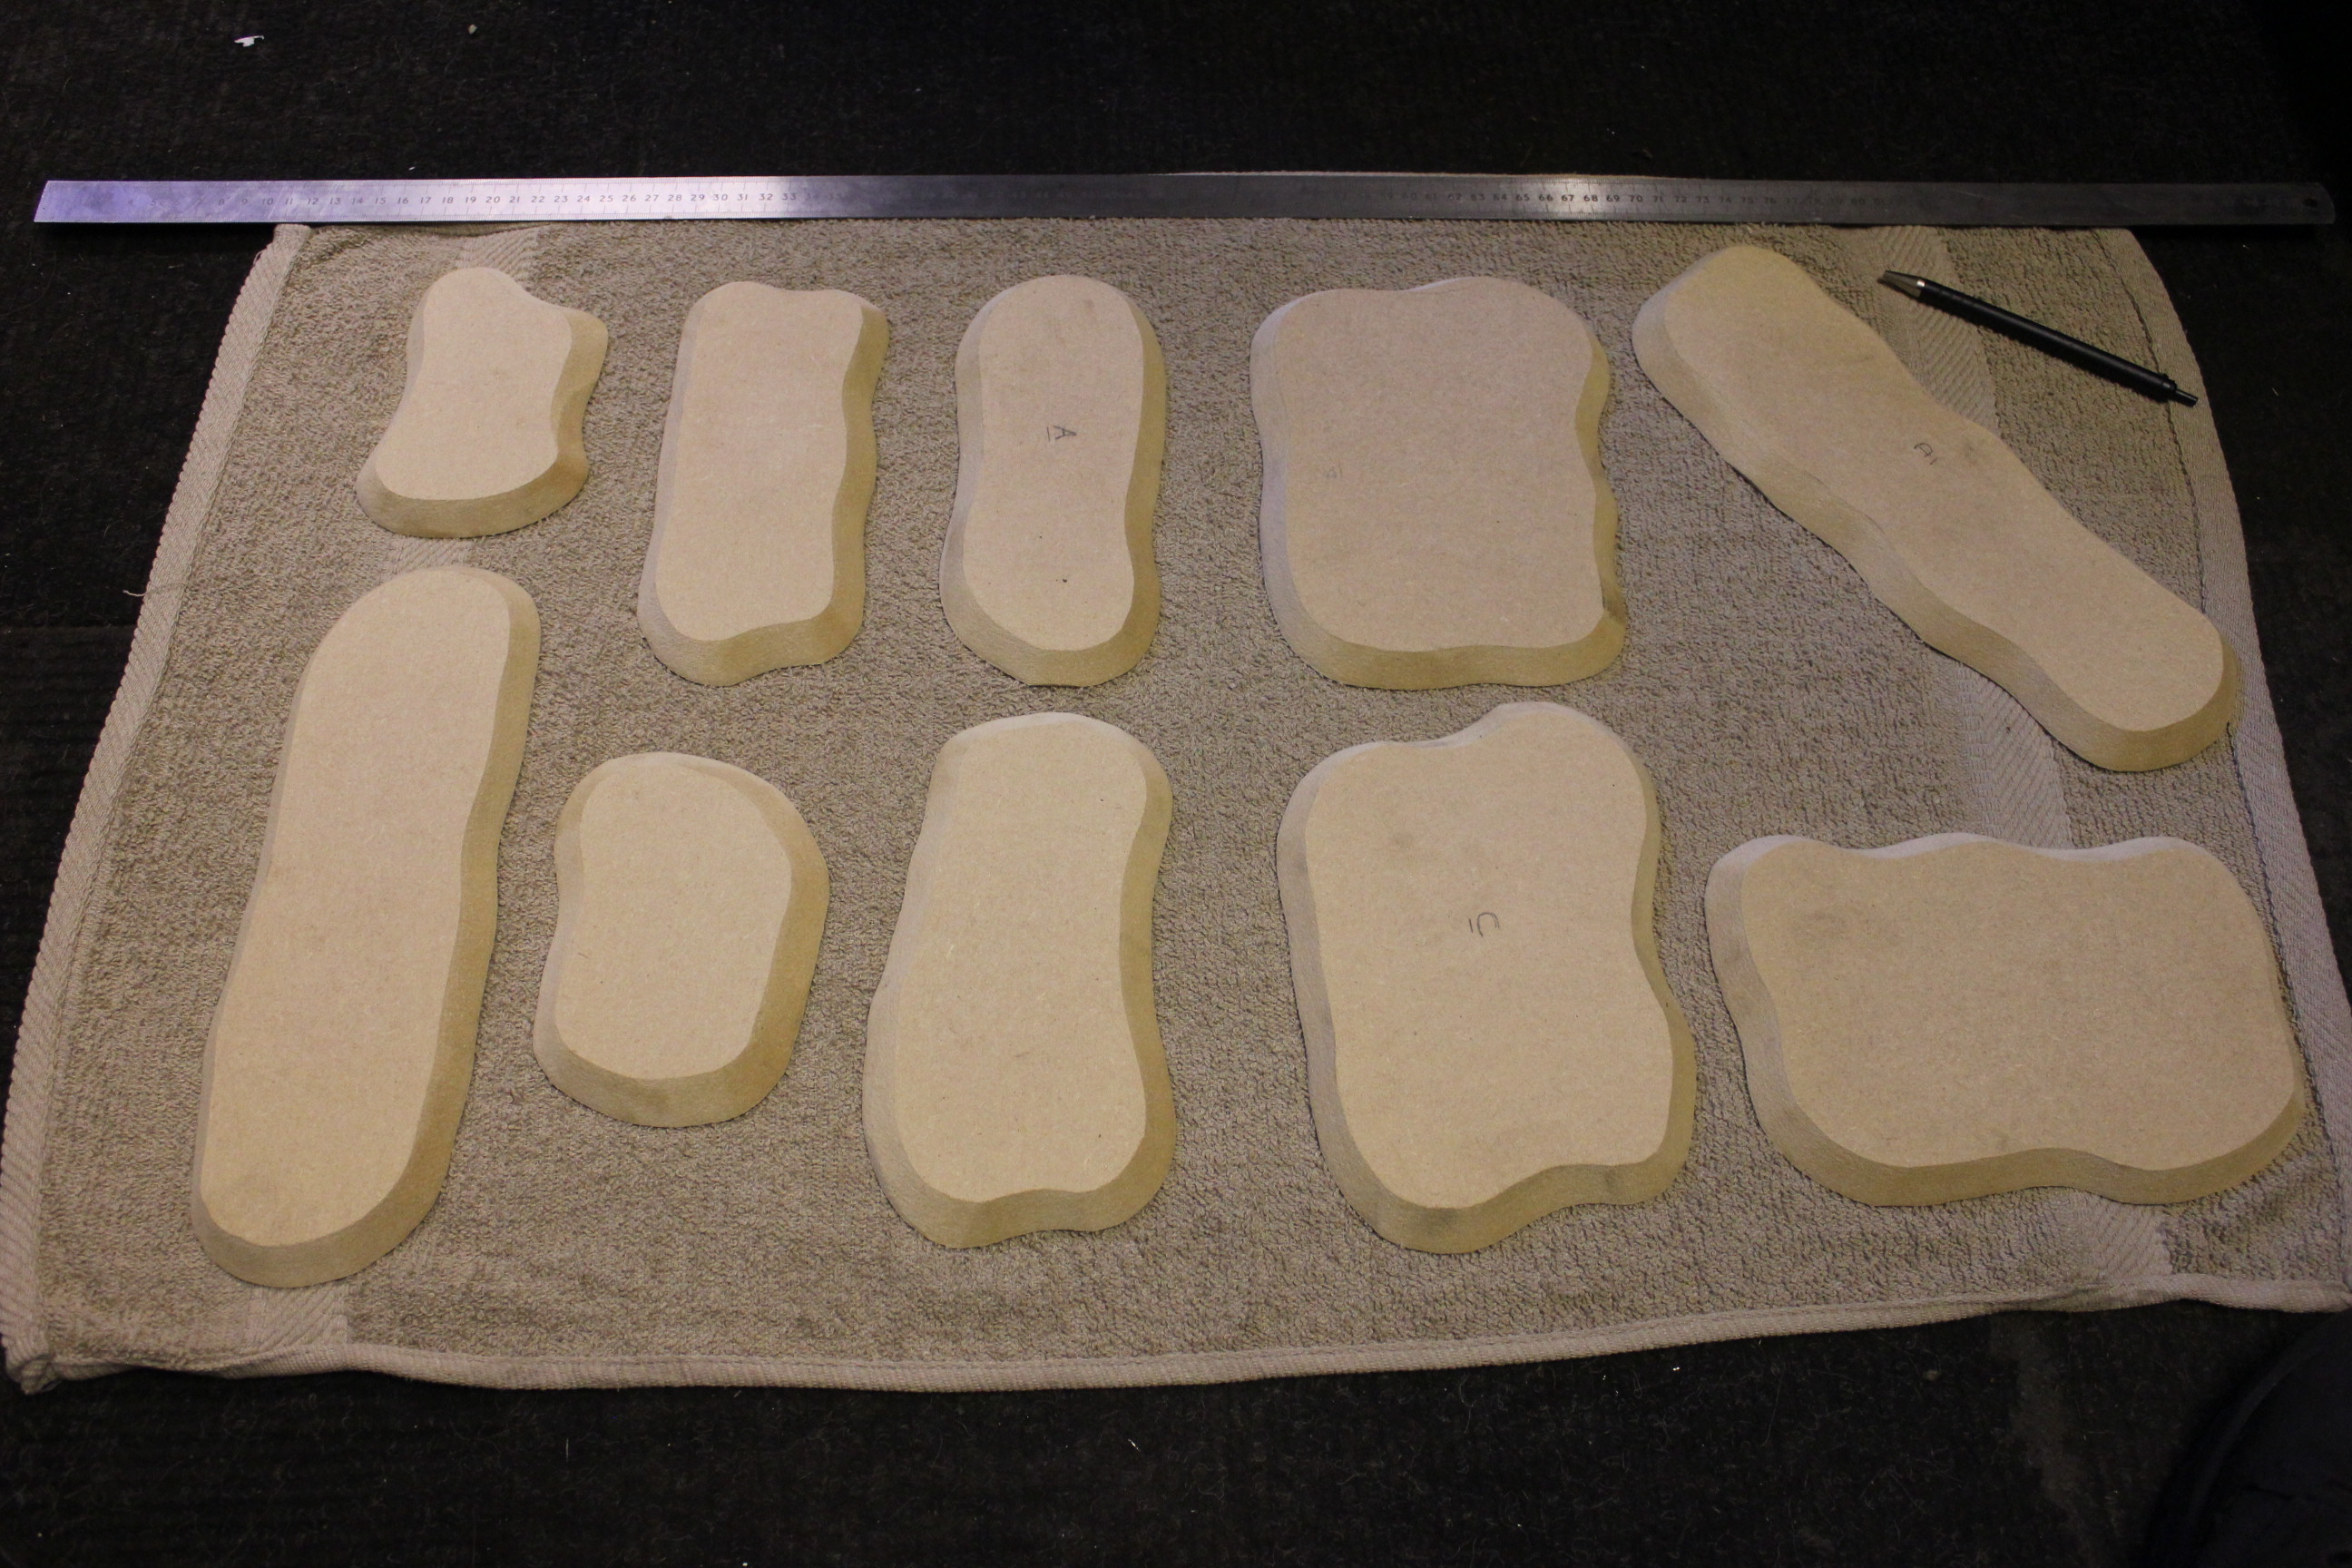
After carefully investigating of the modelling hill supplied to use as a pattern we found the name of a company. I contacted them inquiring if they had any more and their reply was “This was a custom order and we don’t do them anymore”. They also couldn’t recommend a place to supply them.
There may be niche parts of the internet that supply them and most defiantly local suppliers that don’t market to people online but whatever the case this allows us to get our foot in the door and reach out to the many people on the internet like yourself.
After a lot of thought we found a way to manufacture the wood stands and we can now offer them in a standard thickness and almost any size and shape that is wanted, if that’s too much choice, there is a good selection of different ones on our Ebay listing. link to Ebay
The wood has a nice surface texture so that I can be varnished, painted or left bare.
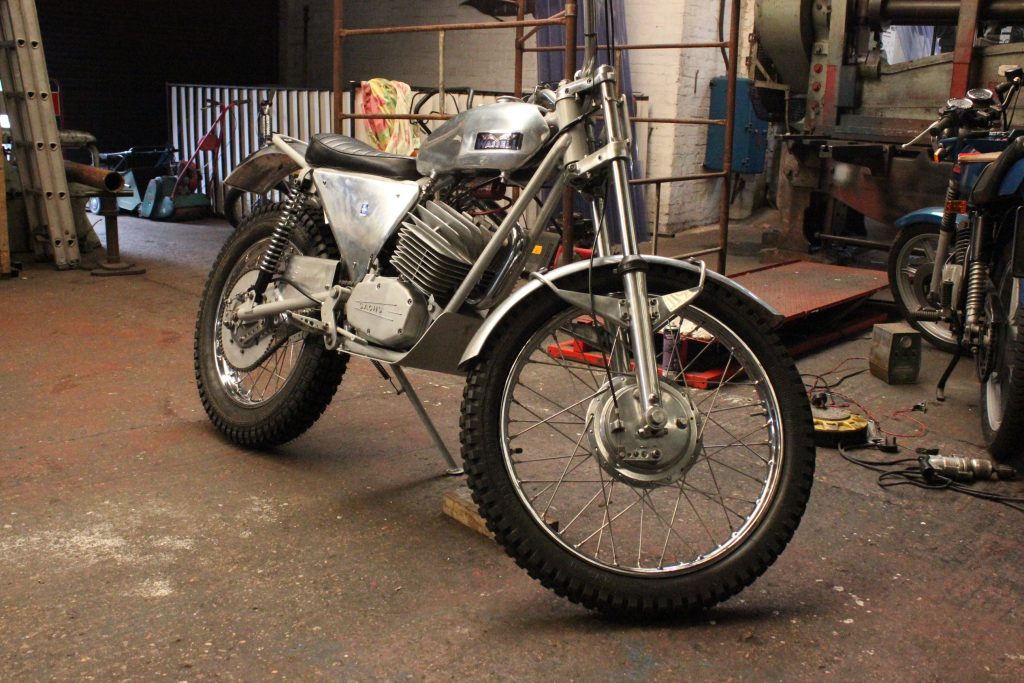
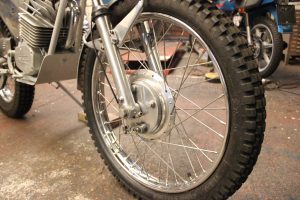
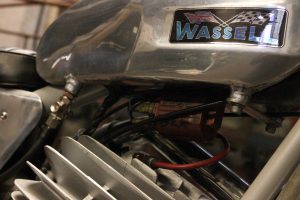
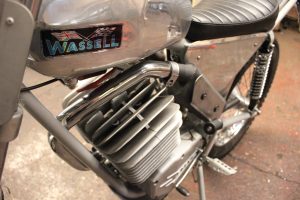
W.E. Wassel ltd advertised themselves as suppliers of motorcycles accessories and components but they found time to incorporate some of there parts into a rather nice trials bike with several different engines fitted from several makers.
The Wassel that came our way had a previous 10 owners so any kind of misdemeanor or ill worked parts could have been carried out and will no doubt rear there ugly heads. This wasn’t so after stripping the Sachs engine out of its frame as the previous owners or the last owner had an eye for attention as there were plenty of parts that had been rubber mounted that wouldn’t have originally been.
The sale price of £309 on the 9/8/1974 wasn’t bad, but a few quid could be saved if you lived in the USA, as they were sold in Woolworth’s major stores in kit form ready for the buyer to construct. Along with the kit came a hideous rear chain guard that looks like it found its way off of one of Evel Knievel’s bikes or a 1950 pram.
Reading through the sales brochure which cites all the technical data I found not one reference to a part made by Wassel, even though I am sure they made the handle bar gripes, at least.
The Sachs 122 cc engine with a square bore and stroke of 54mm and a 12.1 compression ratio sounds great when they are set up correctly. The big fat cast finned cylinder head sort of overpowers the rest of the engine in its immensity, but it does do it’s job in ridding some of the high pitch noises coming from the thinly die cast bottom end. With simplicity in manufacture Sach’s found it prudent to arm the gearbox with 6 speeds and as standard a 64 tooth Renold chain of 126 pitches and dimensions of ½ x 5/16 that was run through a chain tensioner that had to be set up right to avoid the chain climbing off of the rear sprocket and kicking the rear wheel over on it’s snail cam rear wheel adjusters that I don’t like. The engine nestles easily in its duplex frame and as standard, a Hammerite silver finish that was advertised as, “easily touched up after a scuff”. Underneath the engine is the sump guard that as standard should be highly polished but I think it looks better vapor blasted. The 6 inch conical brake drums are really eye catching particularly when polished. But I wouldn’t have had the original rims rechromed as it is so expensive. New pattern rims are easily available but without the original Dunlop markings. The aluminium petrol tank had taken a beating in the past. Most of the dents were eased out with tools put through the filler hole. Only one small hole was drilled in the underneath of the tank to ease some other dinks out. The alloy side panels were remade as dents over the surface of the originals would be impossible to remove. You will notice a little badge on the side panel that was in very poor condition but we managed to restore it.
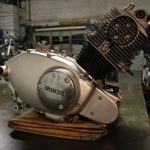
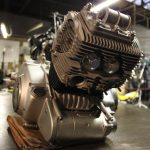
The little twin 150CC is as usual, easy to work on as all multi cylinder Honda’s are.
This little beast came to us in the poor external condition when delivered by the owner. I thought it a good idea to remove the top end in front of the owner wile he had a bit of time to spare, head off, barrel off and the pistons where in prefect order with no ware to the barrels. I was given the order to restore to new condition.
The first part was the strip down of the engine, and no surprises, all was typical Honda layout. The castings were released from the internals and put in the vapour blaster. Because the early Honda were not pressure cast, particularly heads, barrels and crankcases they don’t clean up great as there is usually staining in the cast material. Early Honda castings were not dye cast under pressure ensuring a close grain which would not readily oxidise. Early Hondas such as the black bombers and Benlys were not pressure cast. When blasting this type of metal it is difficult to get it perfectly smooth and blemish free. A good finish will be obtained using shot blasting but this process opens the casting to very bad oxidisation due to the high velocity of the grit dimpling the surface, this increases the surface area of the material and thus increases the amount of ion exchange between the material and the atmosphere “causing rust” although this doesn’t effect aluminium for long due to its oxide layer acting as protection to further oxidization, Steel doesn’t have this property and will eat into the metal if no further finish is applied to the material such as paint or oil.
There was no hold up in the restoration as we hold a lot of Honda gasket and seal kits in stock. The picture shows what I have done in so many hours. All the nuts and bolts have been changed over to stainless fittings as originally supplied by Hap Jones in the USA. So you can’t say that’s not original. The cast iron barrel was shot blasted and then heat proof black sprayed. This engine had languished in a barn for years but the internals were all in excellent condition with no ware, having the mileage of 20,000. It obviously had regular oil changes.
The gearbox layout and all the associated internal parts had Honda written all over them including the sifter mechanism. There are a couple of niggly bits if you are not working from a manual, it can be placed in one of two positions. The chains have links fitted and the valve timing sprocket has one off set hole out of the 3 holes. When setting the valve timing the slightly out of position hole must be set at twelve O cock and the zero stamped on the gear must also point in the 12 o clock position when the flywheel generator is set off the “T” mark which will be aligned with the fixed pointer. The ignition timing is effected by aligning the “F” for firing mark on the rotor with the fixed pointer and then the points are set to just open. Typical Hondas, easy.Really there is not much else to mention about this very simple engine that would suit a newbie at engine rebuilding.
The position of the ignition timing cam will be obvious as the points plate will only fit in one position as a green wire from the rotor coil will restrict the plate and only allow it to be sighted in the correct place. When fitting the timing chain link, be careful as there will be much digging and delving in the engine nether region and much cussing.
If the valves require inspection or grinding in then prepare your self in replacing the little collets as they are tiny and awkward to refit. A screwdriver that has been magnetized will do the trick of getting them home, but you will need another driver that is unmagnified to push the collets off of the magnetized driver and seat it in the collets holder.
Although there are factory Honda workshop tools for working on this model, the only tools required is a 14×1.25 mm bolt 25mm long to remove the rotor and a trick valve spring compressor
The cam chain is best changed whenever rebuilding and the cam chain rotates anti clockwise so you will have to place the link spring clip in the right way, IE closed end facing to 9 O-clock, the starter motor chain can be joined a lot easier if the starter motor is not fitted as the chain can be eased onto the little sprocket and then the mounting screw can be tightened to tension the chain. The starter chain rotates anti clockwise so the link spring wants fitting the same as on the cam chain.
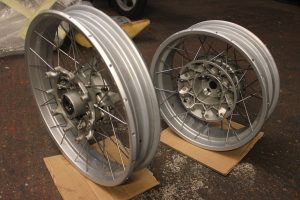
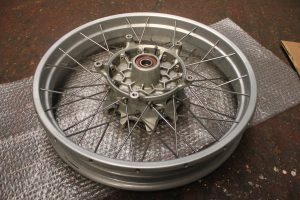
At Stotfoldengineering a large part of our work comes in from other restorers who do not have the machinery or skills to do the job, this work includes aluminium welding , reboring, grinding, and wheel building, to name a few. We have always prided ourselves in having the machinery to do all jobs that come our way and to accomplish all work to a quality finish and to high degrees of accuracy. One job that came our way was a simple pair of wheels that needed breaking down and new stainless spokes fitting also chrome plated alloy rims needed reconditioning and lastly the wheels needed truing. The offsets on the hub in relation to the rim where noted and the old spokes were removed. The nipples were put to one side and new spokes were ordered. While waiting for the spokes we ground the flaking chrome plating away form the rim to give the best finish we would get. We have found in the past that putting the alloy rims in a chrome stripping bath would always come out pitted and the chrome only partially stripped, leaving us with hours of finishing work.
We finished the rims and lacquered them and then we started spoking them up. This is reason BMW thought it a good idea to fit tiny grub screws inside the nipples to lock up on the ends of the threaded part of the spoke also the chrome plating aluminium rims on these wheels is a crap idea as well. But the spokes naturally lay in there correct positions unlike a lot of wheels where the rim spoke dimple angles can lead you up the garden path.
BMW made the rim truing a sole destroying task. After several hours pissing about with one of them we decided to phone Hagons who said they don’t do them anymore due to the time it takes, they went into detail about how the truing process on that particular wheel is seemingly illogical and went on to say about his suspicion of BMW not even truing them up “properly” as they came out the factory. After many hours of though and dial testing for trueness breakthroughs were achieved, but it wasn’t good enough. I read a few things on the web and found anyone taking on the task were doing it to get there bike back on the road, they were having to do it themselves as no wheel builder would undertake them and if they did they would charge between £350 – £450. per wheel.
Thanks BMW for producing a shitty set of wheels. apparently, speaking to several wheel builders that have been bitten by BMW wheels they have cut there losses and given up or they finished the wheels and got them to run truer than the original as the originals never ran true and vowed never to do another BMW wheel. I can gladly say we can do these BMW wheels but they take time and Bob “our wheel builder who knows a thing or two about spoking wheels” gave the wheel a try and succeeded at producing true wheels in good time.
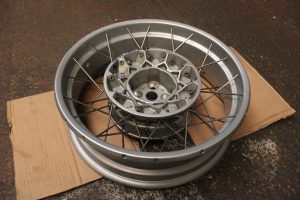
I’ve never known anything like these wheels here is some of the specification.
- Chrome plated aluminium.
- Chrome plated spokes.
- Grub screws inside spoke nipples.
- Non standard truing.
- Special jig for doing rear wheels as it is a single sided swinging arm.
I don’t consider there to be anything right about these wheel. And I found building them, soul destroying.
This all happened when a dealer had a potential buyer. The customer with the BMW said he would have it if the rims were refreshed with new spokes. The dealer probably rang Hagons or Central wheels and didn’t get any joy, so he phoned me and my rely was a “wheel is a wheel”, we do hundreds of them, “Bingo”, he’s consigned himself to me inadvertently by purchasing the required spokes I requested. Unknown to me it’s a shitter of a job.
He paid for prepping and painting the rims and also paid out £170.00 for stainless spokes. The rims were a bastard to paint as they had to be as silver as I could get them and powder coating wasn’t going to achieve the desired silver and they also wanted lacquering. The materials for the paint and lacquer job minus labour was £95. The labour was about £160 per wheel as the acid etch primer coats needed rubbing down so many times. After a host of expected delivery times from me the dealer found it prudent to pass his customer onto me to take the pressure off his back.
The customer duly phoned me and I said it would be about a week as it all depended when the rims were coming back from the painters who were 2K lacquering the rims for £30. The rims came back to me and I got a call from the dealer who asked if I had built these wheels before I replied “Yes, as they are like any other spoked wheel”, he signed off sounding quite happy, but I’m sure he knew that I was going to have problems. After 12 hours at £55 per hour equating to £660 of solid shit and soul destroying demoralisation the wheels were finished at a total cost of £1115 or £557.50 each when I quoted £430 for the pair and the dealer allowed me to up it to £460per pair. What a shitty deal and I won’t get hooked into the situation again and I will never own a BMW unless it’s a vintage one. If you ever purchase a single sides BMW swinging arm yourself. Use some rattle can silver and spray the wheels on the bike, they aren’t worth removing although they don’t look bad when there done.
There are the 3 things you should never buy, boats, plains and women, you only rent them, and don’t forget modern BMW’s. Enough said.
Applicable Models for panther motorcycle settings
Panther 20, Panther 30, Panther 40.
Years – Panther 1932 – Panther 1939
Plug
18mm, lodge H3, champion 16
KLG M60
14mm, lodge HN or H14
Champion LY05, KLG F70
Tyre pressures
16lb per sq Inch front type
18lb per sq inch rear type
Carburetor
Amal standard needle jet type
Main jet 80
Throttle slide 4/5
Needle jet STD
Needle position 3
Engine oil
Castol XXl (XL) winter
Shell x-100 40
Shell x-100 30 winter
Mobil oil BB
Mobil oil A winter
BP Energol SAW40
BP Energol SAW30 winter
Essolube 40
Essolube 30 winter
Gearbox oils “amount 2-3 oz”.
Wakefield castrolease
medium BP
energrease A0
Vacuum modilgrease No2
shell retinax A
shell retinax CD
Esso grease
Valve clearances
Zero on inlet and exhaust
Contact breaker
Miller gap 0.018-0.020 inches
Lucus Maglita 0.010-0.012 inches
Ignition timing
5/16 before TDC
or 33 degrees BTDC.
Piston clearances “in inches”
.004 at bottom of skirt
.007 at top of skirt
.012 at the ring lands
Rebore when wear is .004-.005
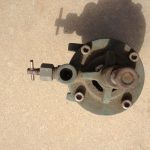
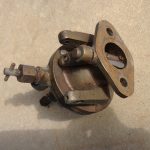
I get quite a lot of emails about people requesting information and work to be done on carburetors, repairs, restorations, where to get spares. This blog I’m devoting to carburetor identification. I would like to share with you the reader. the email conversations and images that get exchanged.
Below conversation 22/08/18
(chap)
I have here a couple of brass carburetors, I wonder would you know what they were from and how best I would place them as I would hate for them to go to scrap should someone need the part. Photo’s attached, I think the smaller one is a Smiths, like on your website?
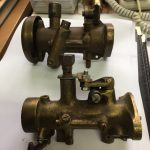
(Me)
Hi Darren we often get requests for carb identification. I think both of these carbs are from stationary engines of single or v twin configuration. the makers of the carbs didnt allways put there names on the castings. you will find that carbs fitted to all cars would be sporting there names on the carb bodies. hope this helps and will give you some leads. cheers terry.
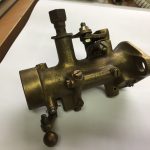
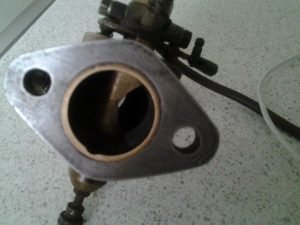
below conversation 21/08/18
(chap)
Hi Terry I have an old carburetor which I have no idea the make , year or what it is off. I have googled for years on and off with no luck on finding anything similar, whilst googling I came across your web page and wondering if you would possibly know what this is please.

(me)
This is probably from a jap stationary engine.
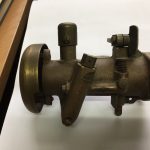
below conversation 26/05/2023
(Chap)
Would you have any idea what type of carburettor this is, please?
It has a rotary throttle rather than a slide and no float chamber.
Thanks and regards,

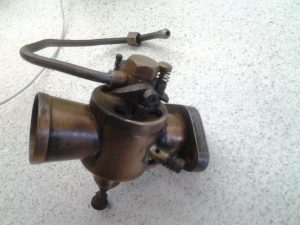
(me)
I am not sure on the manufacturer. in the past a lot of stationary engine manufacturers made there own carbs to suit there engine. the carb didnt need to sell itself. ie it didnt need a makers name cast or stamped on the carb as the makers name would be on the engine. the no name carbs always allude me.
The Puch VZ 50CC Dakota bike is owned by a traffic cop who could not let it languish anymore after taking apart a long time ago when it showed ill performance of below 30MPH. The Puch Dakota was duly bought to us for a full restoration. On looking at the rusty parts languishing in sweaty old cardboard boxes I had my doubts weather this was going to come of anything. It has been sitting so long in a sweaty shed that the colour was red oxide rather then the cheeky lemon yellow that Puch assigned it to.
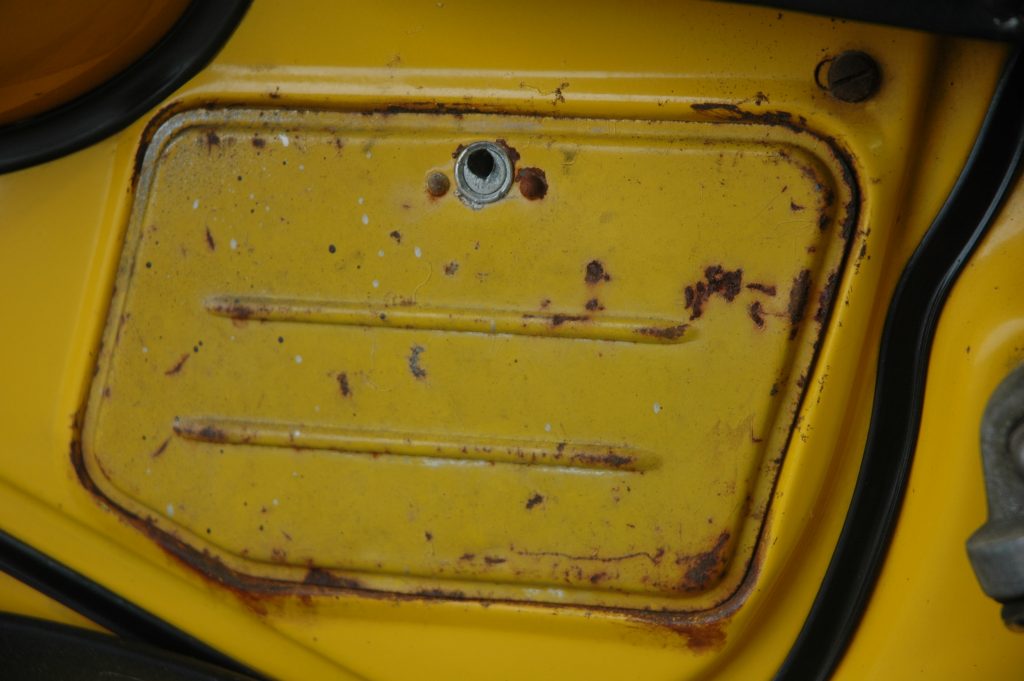
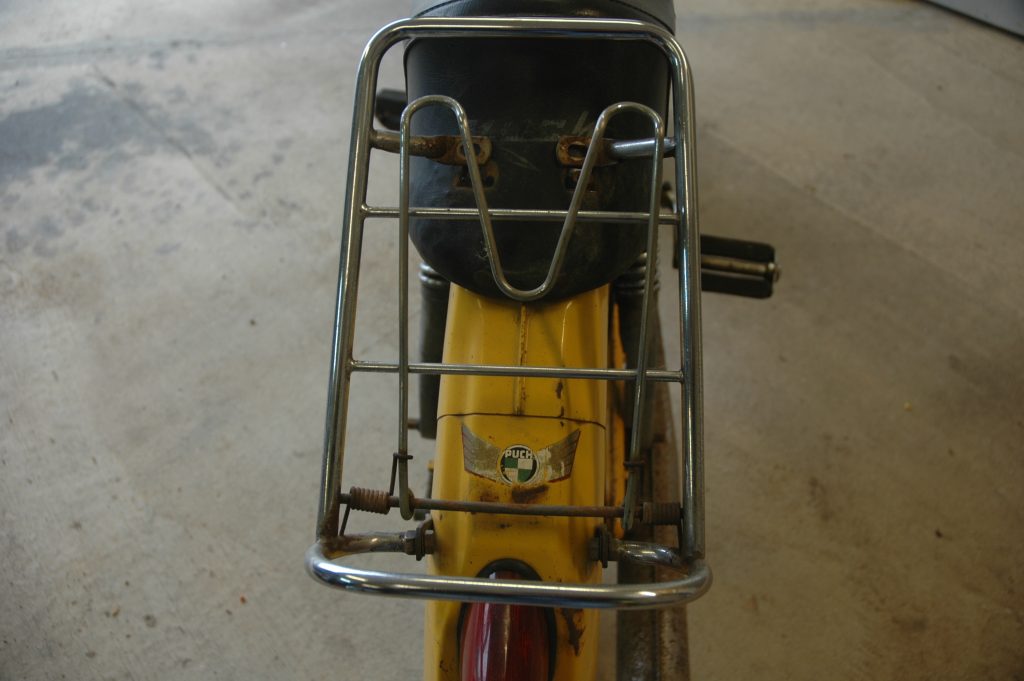
On grappling though all the Puch Dakotas rusty segments and sorting them out on the factory floor things didn’t seem so bad. A tank with the usual dent in the chrome and the frame that was bolt to last a life time didn’t make this restoration such a daunting prospect.
Typically I like to tackle the difficult parts first. Any chrome plated parts that have dents in them are a challenge and I’m up for it. The tank was the main eyesore as the handlebars seem to like to slap into each side of the tank area that has chrome deposited onto it, loads of dollying out with my special tools seemed to put it back into shape and it showed as good as the day it was born after the rework and the chrome finish.
The way I winkle out dents in tanks is through the making of special tools for inserting into the tank and working the metal from the outside of the tank to conform to the desired shape or form. It can take sometime to achieve the shape and form so as it can go through the plating process without copper plate filling.
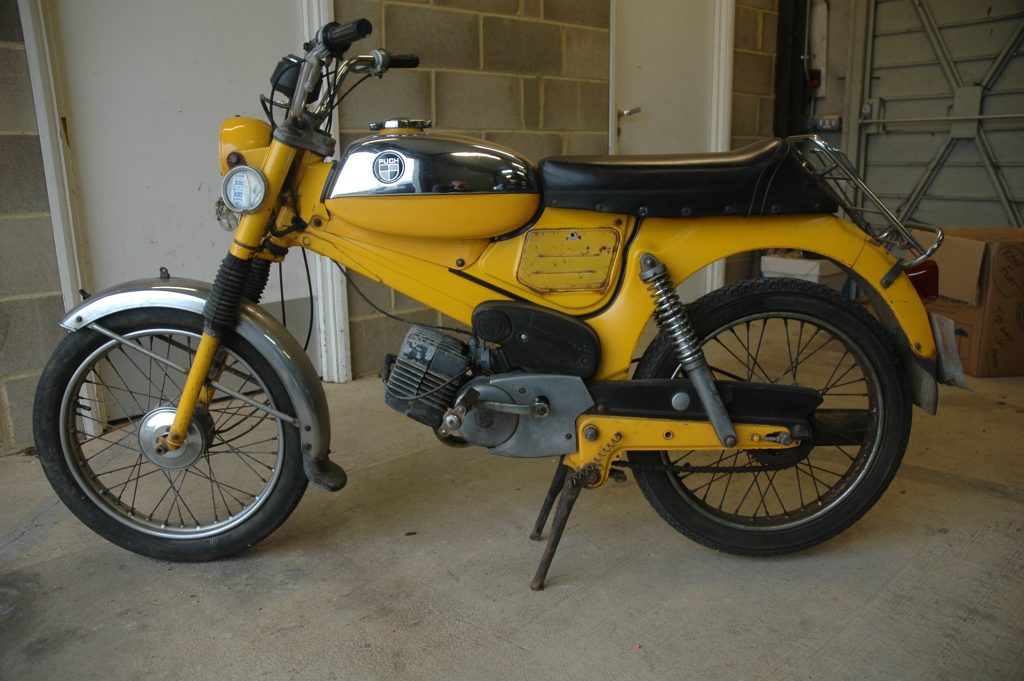
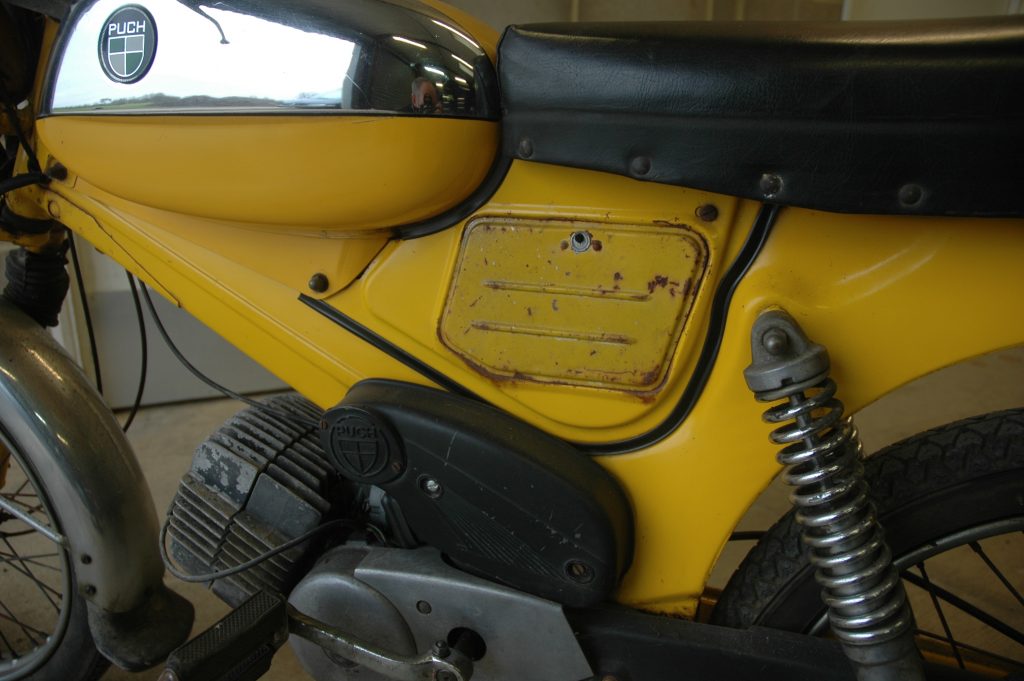
Old 50CC Puch
The Puch Dakota frame being a stressed member that the engine hangs on is bullet proof and is made out of good oil treated pressed steel. When steel sheet is manufactured one of its end stages is pickling and oil treating. If you want to go for the early Scoda system you will want to follow them in the pickling and pressing and painting route. It doesn’t quite turn heads in a couple of years time when your looking at loads of dusty rust on the chassis or blistering under the paintwork.
These little Puch Dakotas were produced on a budget but not to the highest of quality. The engine wasn’t a performance unit but it got you from “A to B” in a nominal time. They were generally built for the inner city gent or town folk who aren’t in a rush anyway, the simplicity of the Puch V2 50 allowed it to be run ragged as the manufacturer had foresight into seeing that it should be simple enough in design and manufacture that not a lot could go wrong with it. Fresh oil changes were frequently neglected as well as chain care and general oiling of the exposed components.
These lemon yellow meanies were fast in there day when all they had to do was keep up with the intercity traffic as to get you to the office on time with your briefcase ensconced in the holder on the back of the seat. This little might could pull 35MPH on full chat with no effort eccept for a full fist of throttle on your part. The Puch Dakota that we restored got a complaint from the proud owner that he had got second in show against a fully nickel plated Harly Davidson and that when he was buzzing home at full chat at 35MPH a cyclist overtook him on the flat.
These bikes new from the shop floor would only do 35 flat out. Small carb, restrictive, silencer in the exhaust system and a good strong pressed steel frame kept the speed down to a sedate city ride. A lot of restoration that I have seen seems to restore the lemon yellow colour to what the colour has turned to after 30 or so years of patina. These bikes were really lemony. Love them or hate them with the pedal back, the pedals to put the back brakes on in true American bicycle
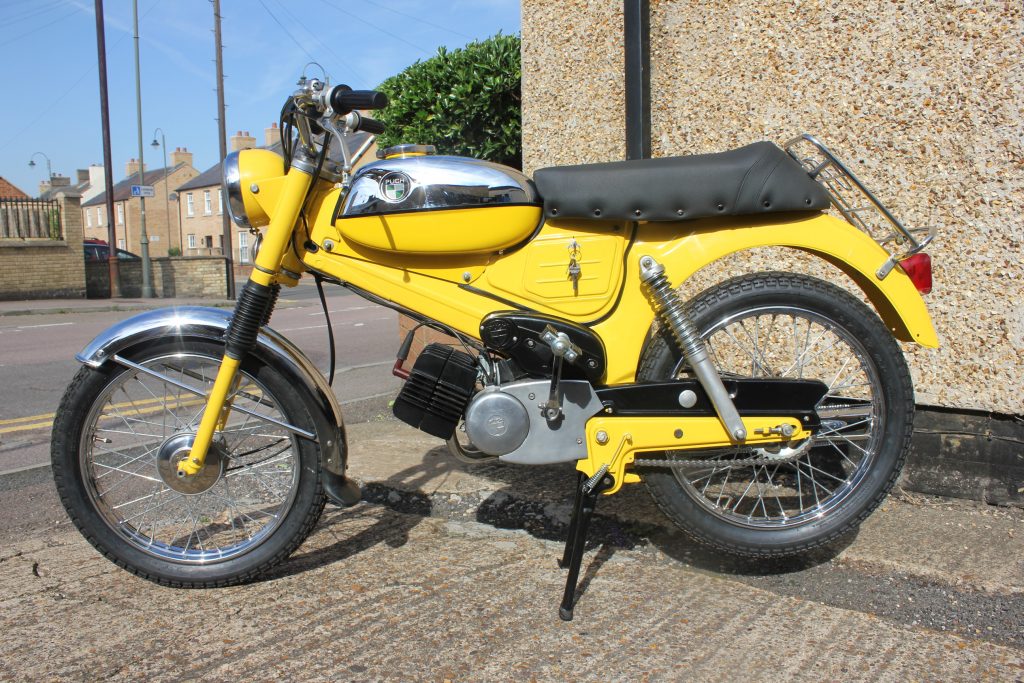
Fully restored 50CC Puch
The top speed when brand new off the factory floor was 38 mph exactly with 3.25 HP to boot. There is of course a tuning kit for your model and it will do about 65 mph but bang goes the reliability. I am so sad that you got second to an American glitzy plodder that is massive compared to the vz and has less power per cc than an outboard vintage seagull engine per cc and to think of it, less power per cc than the vz. Lose some more weight and you may beat the pedal cycles if the wind is blowing in the right direction.
After the customer received the bike he put a few finishing touches on the Puch, including handlebars the same as original, tyre pump and rear mudflap.
He said “I rode it to a VMCC meeting and got 2nd place. I lost out to a Harley but Puch was really the better restoration and the rarest bike there. So I was robbed..!! On the way there I was overtaken by a bicycle…no kidding.! She will do 38mph flat out.”
The 1929 BSA B29 was brought to us as the previous restorer had for some reason aborted the project and some how, had lost or miss laid a host of parts that the owner never knew were missing on return of the bike in bits. Unfortunately on inspection some very important major parts were missing. The front part of the restoration was to be my favourite bit, the engine. Even though the entire bottom end was built up I thought it prudent to strip it down and cast my eyes over what had been done by the previous restorer “oops”,not much.
The crank on removal was good as well as the big end, even though it had never been taken apart so I dropped it into my paraffin bath to see if this would reveal anything untoward after the thick black oily residues were diluted, it still showed good with no notchyness or slop on the conrod. His bike had never done many miles or it had and the bottom end was rebuilt years ago.
The barrel and head is a one piece item and some very careful honing was needed as the honing stones can grab when they reach the extremities of the barrel due to it converging into the combustion chamber. When I look at a one piece barrel and head all cast as one I find it a marvel that the foundry that make it had such skills that I think have all been lost due to the UK looking abroad for cheaper castings and passing the buck on the effect it had on climate change. There are of course a host of micro foundries in the UK casting non ferrous metals such as aluminium and brass but the non ferrous heavy casting industry has nearly dies a death and is down on its heels.
At our small workshops we used to ever haul loads of foundry equipment such as molding machines and sand sieves and graders for some bid companies.
The piston was missing its small end pin so I looked though my vast stock of old engine parts that would full fill the job, although a little long on length a bit of grinding sorted it out. The missing piston rings were made from close grain cast iron and were fitted with the correct gap. Old small end pins were commonly fitted with what were called buttons, these were pads of aluminium fitted to each open end of the small end pin that controlled the end float, nowadays this end float is controlled by circlips. The buttons when pressed into the ends of the small end pin would have radiuses so as to match the radius of the cylinder bore that the piston rides up and down in. The buttons were made form aluminium grade HE 30, don’t go any softer then say HE 15 or HE 5 as they wont put up with wear. The valve guides are cast into the cylinder head are not replaceable they are an integral part of the cylinder and head casting so some valves with oversize stems were found and fitted to take care of valve guide ear and the valve lengths and heads were modified to fit. Grinding the valves into there respective seats is always necessary.
I don’t want to bore you “the reader” what else was done to the engine as they are not a complex engine being a side valve motor. The petrol oil tank was repaired by me and 2k sprayed by my brother with the correct decals and John Bull rubbers.
The BSA 3 speed gearbox is a simple affair to overhaul but I managed to get a modern oil seal to fit into the primary side to sort out any impending oil dumps through its original metal mechanical seals.
The precious text detailed a few things that were done to the engine and gearbox. The engine needs marrying up to the gearbox employing engine mounting plates, these were missing so I procured the Bruce Main Smith photo copied manual that was supplied by the owner and found a microscopic view of them. the datum to work from when a major part like this is missing is the primary chain case length, when it is wrapped around the primary gear, on the end of the crank and the clutch drum gear, if you don’t know the chain length you will have to resort in a bit more investigative work. The manual out of interest was concise enough to give the link count of the chain so as to alleviate me from guessing.

The engine plates not only holds the engine and gearbox in situ but they also act as mounting points for the rear wheel horizontal support stays of which we only had only one of them as the right one was missing so I make the right one as a mirror image of the left but with a bracket welded on to take the rear brake steady bracket. This bike so far would have not become anything but a bag of bits as a lot of ingenuity and a broad know how of the use of sheet metal and milling and turning machines is essential unless your going to entrust it to somebody else to do, but they are only going to make what you draw or give as a pattern and it can’t be done on a CNC or CAD machine, they have to be hand made as if they were prototype parts.

I worked out the engine plates and got the gearbox adjustment slots in the right places according to what I thought. I put the new horizontal support stay and measured the front wheel spindle deck height and applied this height to the rear wheel spindles so as to give me a view of how all the other parts were going to lay and match up. “bingo”, the owner came up with some much needed parts that were missing such as the rear frame that attaches the seat stem to the rear wheel horizontal stays, the seat, the front and rear brake plates, “and what I really needed to tie all the rear components together” the rear mudguard, how can the precious restorer loose so many parts?
leaving me to try and do a cost effective restoration the bingo component were gotten from a chap that was met though the BSA owners club that happened to be restoring his BSA B29 and was wiling to lend out parts to be copied by someone willing to put in the effort of manufacturing them. If you give me a pattern part to make I bet I can do it as I’ve never failed. With the loan of the rear mudguard I could work out how other parts attached to it such as rear rack, toolbox, rear stand strap and number plate and the cut out for the down tube stays in the rear guard.
The brake plates were made from solid discs of mild steel and turned in the lathe to give the exact dimensions as the original loaned ones except I crept in a few modifications that would take care of the older bearings that I had fitted to the wheels, front and back, on inspection you will find in the pictures that even the rear brake anchor plate has been hot riveted and is an exact replica. The wheel spindles were missing so some new ones were made from EN24T steel and are machined to fit into the new bearings.

Who would lavish all this detail into replicating parts for an old bike? It starts with the interest from the owner and his passion and passing this, he or she is lucky enough to find somebody with the skills and know how and passion to finish the job, I like a challenge and will see it through the seat that was loaned. It had a riveted sub frame that I had to replicate so as to fit the bike and give the correct period look. A large Lycette saddle cover was bought from Feked and it fitted perfectly.

The rear chain that I am sure was original showed more than an inch of stretch over its length. Was changed over to an original Reynolds chain from my stock. The rear sprocket was also missing but the book said it was 42 teeth so I procured one from Supersproc and modified it to fit. The rear stand had disintegrated to such a degree that there wasn’t much to work from but Bruce Main Smiths book saw us all right. The front stand was missing so the same procedure was applied to replicate it.
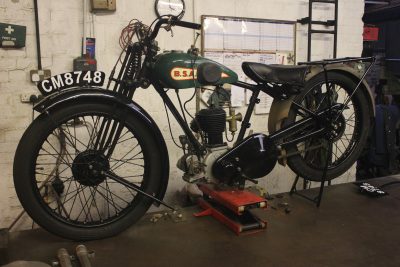
1929 BSA B29
I always fear giving out nickel or chrome plating to anyone else other that a good family friend who usually does it for me but he was too bust to undertake the task so I has to go to a local plater who does excellent work but is as slow as everybody else except my friend. A little bit of plating has held me up on some very experience restoration making me on the final bill for the customer and laten delivery times.
FYI Some of the pictures were taken after completion of the bike then added to the earlier text of this blog.
When your lawnmower needs a service or repair Stotfoldengineers is the place to go, we offer a free pick up and drop off service within our locality.
Our services include.
- Sharpening
- Setting,
- Belt renewal
- Cable renewal
- Carburettors tuning.
- Pull cord replacement
- Part replacement
- Cleaning of parts
- Oil change
- Inspection
Standard service “push mower”.
- Oil change.
- Deck clean
- Cleaning of all parts.
- Oil all working parts.
- Inspection
A lot of mowers use a Briggs and Stratton, Tecumseh and Honda engines as the power unit. We supply all new parts for them. A quality lawnmower such as Hayter with a Briggs and Stratton engine is built to last at least 20 years and will only need a good service when it brakes down “If the storage and oil level are correct”. Seasonal or yearly services are really not needed unless you can’t put up with it breaking down unexpectedly.
We carry out servicing to
- Flymos,
- Chainsaws
- Strimmers
- Hedge cutters.
- Garden tool from an axe to a spades
- Kitchen knives.
Models including
- Honda
- Hayter
- Kubota
- Ryobi
- Husqvarna
- Kawasaki
- Bosch
- Cobra
- STIGA
- Atco
-
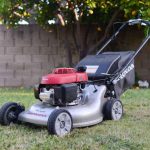
- Honda
-

- Atco
-
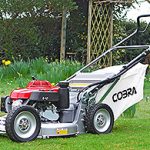
- Cobra
-
- Hayter
-
- Husqvarna
-
- Kubota
Lawnmower blades, pull cords, chainsaw servicing, chain change or sharpening can be done as a next day service.
Our website shows you we can carry out a vast amount of work to all types of machinery including, leaf blowers and vintage machinery.
You may want a quote for your mower service or you may require a quote for major repairs, we will give verbal guideline quotes on the day you bring it to us as we will generally know what is wrong with the lawnmower inspection.
For full services the cost will be between £65. to £120. For a powered lawnmower with a Briggs and Stratton engine machine.
Honda mowers are more difficult to work on and the service costs can be from £65 to £200. depending on what’s wrong with it. Some Honda mowers fit magnetic clutches to them for safety purposes even though a magnetic clutch is not really needed for cutting grass.
If you run an arboreal service company we will be happy to sharpen your chipper blades and stump grinding blades. We can sharpen anything you or your company requires. Professional chipper have blades make out of a metal designed as D2 type steel, we have sharpened thousands of these cutters on a next day service and we have the jigs and fixtures to do a fast turnaround service.
Bedfordshire lawnmower services offer a lot more services to other industries. You will be amazed at what we do. Many lawnmower service companies have not survived the last few years and have closed down due to the work being seasonal, because we cover such a vast array of repairs and restorations to a multitude of machinery we can continue to supply a consistent service to look after your requirements.
Please phone 01767 318 509, we will be glad to help.
Yamaha TW 250
Don’t be disappointed if you’re TW isn’t doing the job of releasing the clutch when you grab hold of the lever and pull it home to find that you are struggling to get an elusive unselectable first gear, yeah loads of drag, this is not usual after speaking to some of my off roader riding mates. These clutches like a good racking and beating to get them appropriate to the riders needs. I’m sure that Yamaha foresaw this, expecting the owner to give the bike a hard time.
The bike that was bought to me hadn’t been horse whipped and showed non aggressive use, no blued plates, no dogging of the aluminium cage that drives the friction plates. These Yamaha clutches like a good battering to get them working. I read on the forums of clutch complaints from namby pamby riders, these machines are made for slaughtering and regular parts being changed and updated. Ride them hard and they will bed in and give good performance. The front brake is often slated for being a little feeble and when given a hand full doesn’t give the desirable effect.
When ever I do off roading my hand is constantly tickling the front break keeping the dot 4 brake fluid on the boil and a little roasting of the flimsy front disc. When you apply the front brake you may find it a little spongy and not as responsive as your usual road machine. Deadening of the front brake when doing trails or scrambles or off roading for your pleasure will bring out the best in your brakes. Yamaha perceived this.
The Yamaha TW likes rough justice and nothing else as it will fall off song on all the components that you require to work, IE: Brakes and clutch. The Yamaha TW 250 is a professional machine and should be used professionally for competition or for hard off roading.
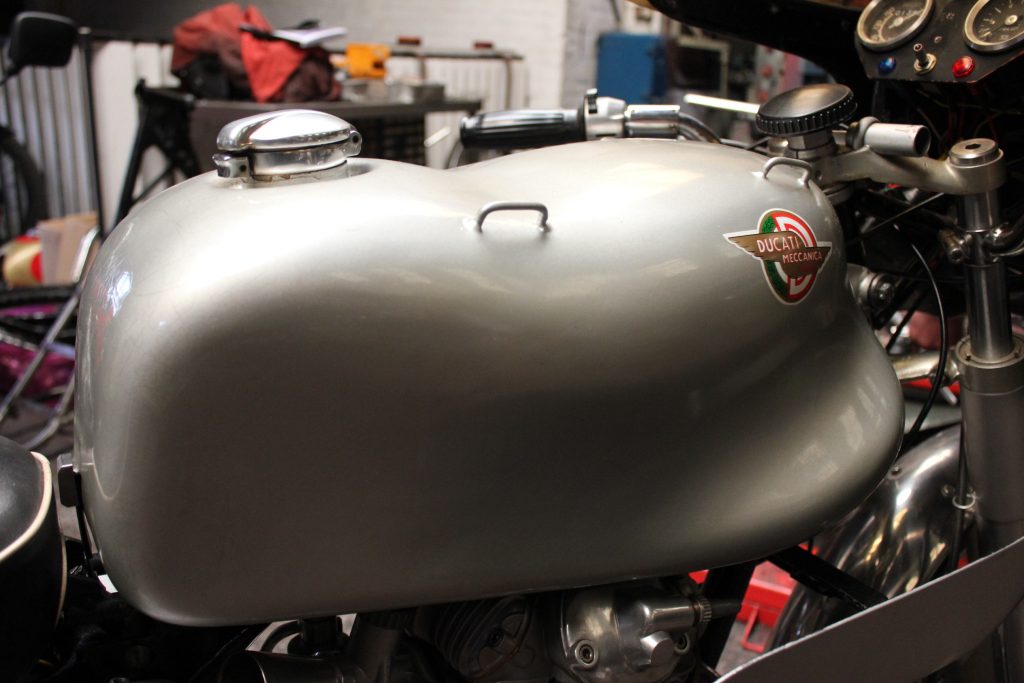
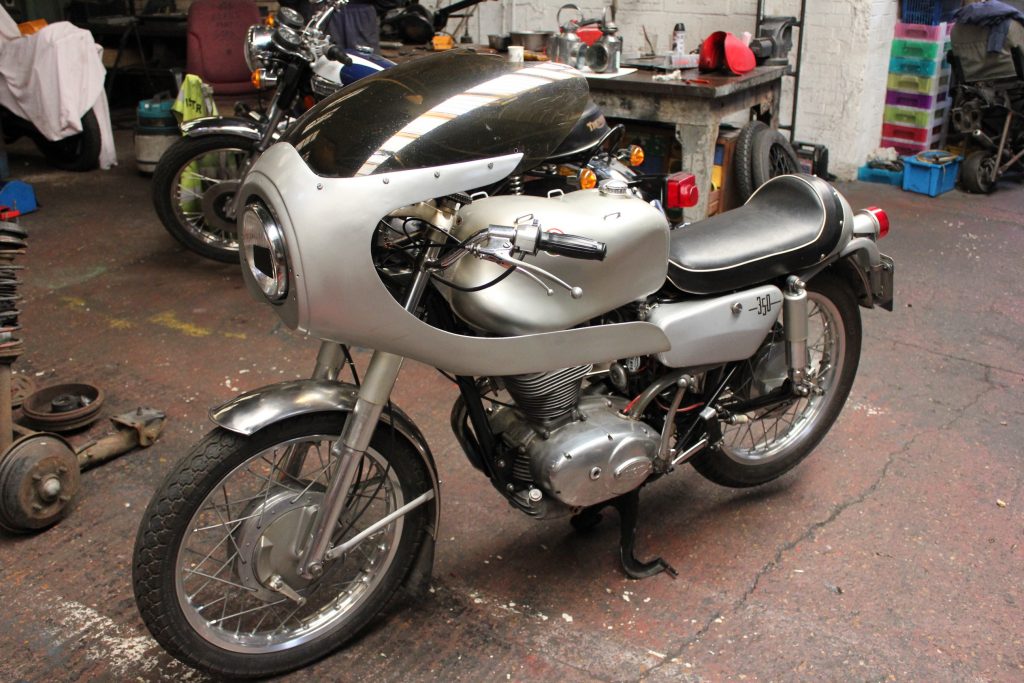
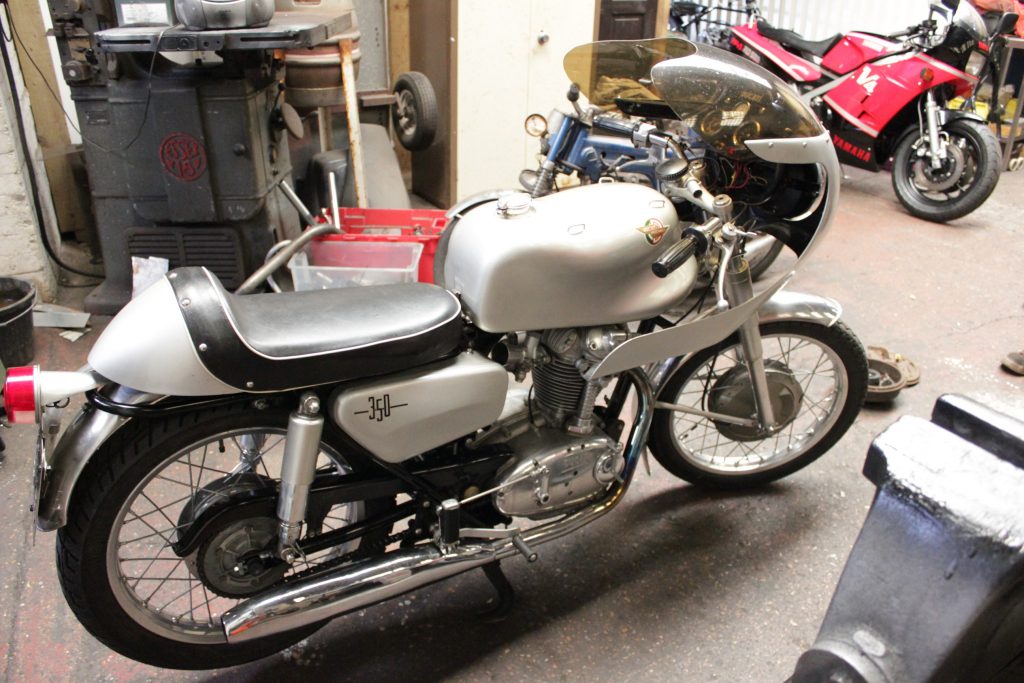
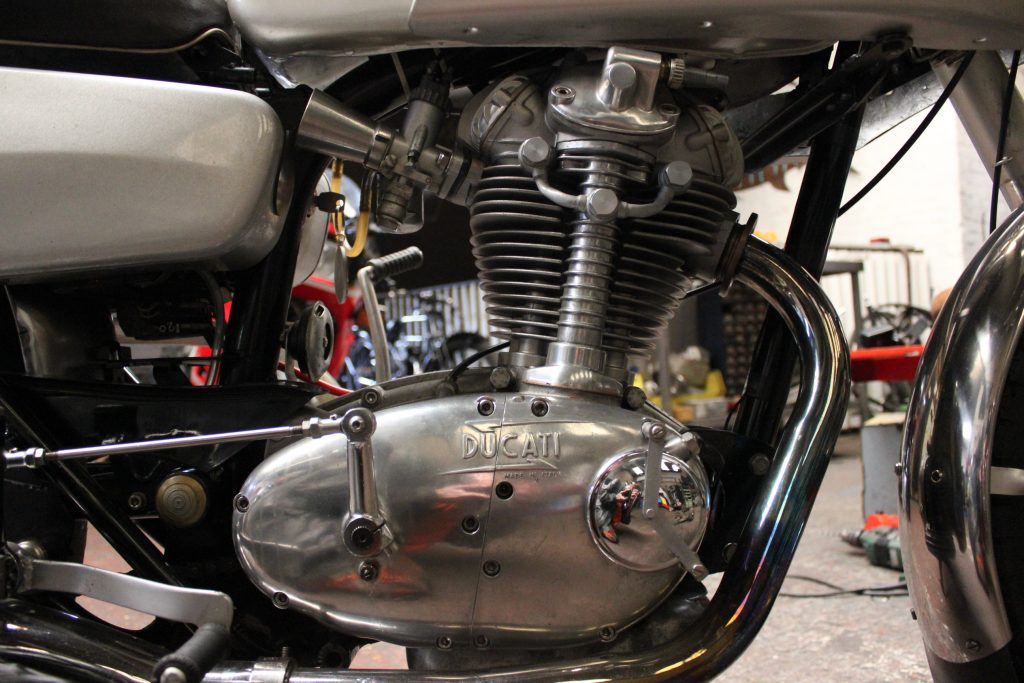
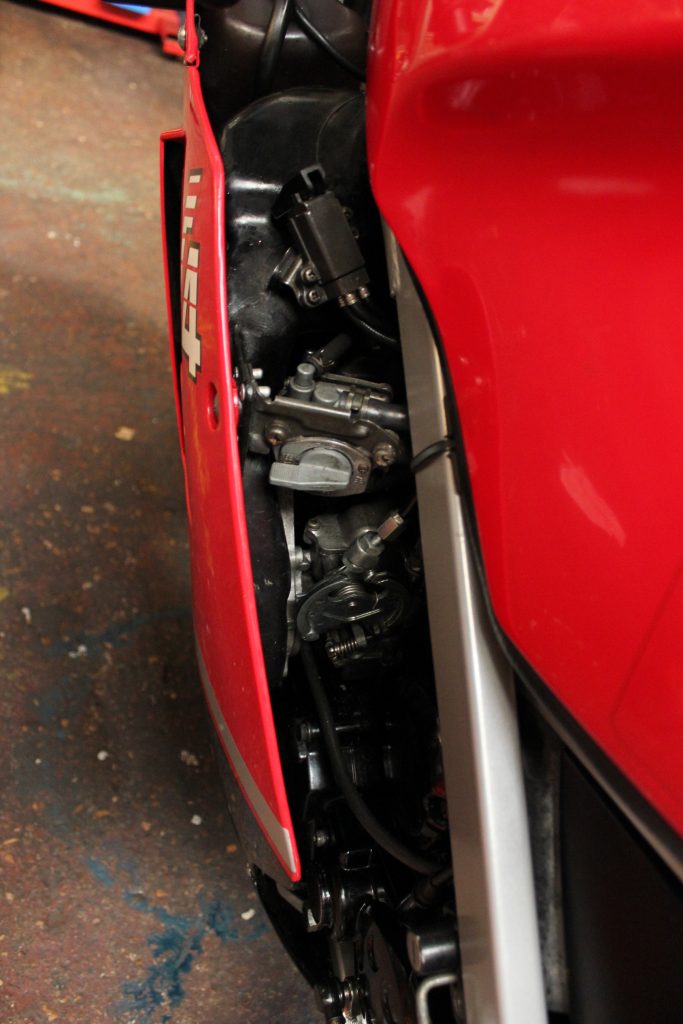
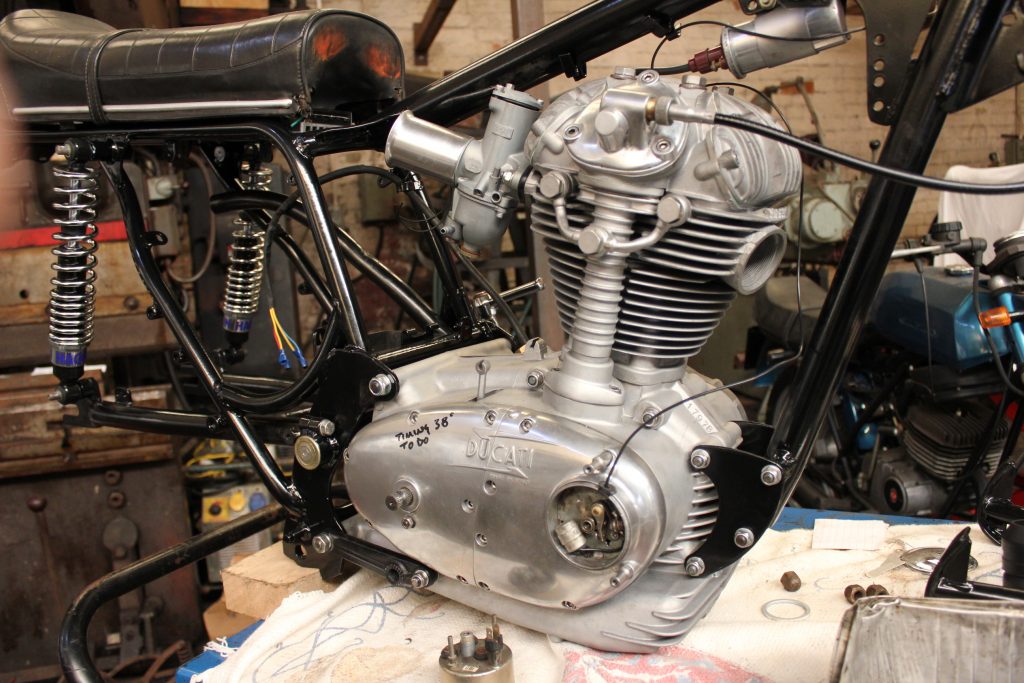
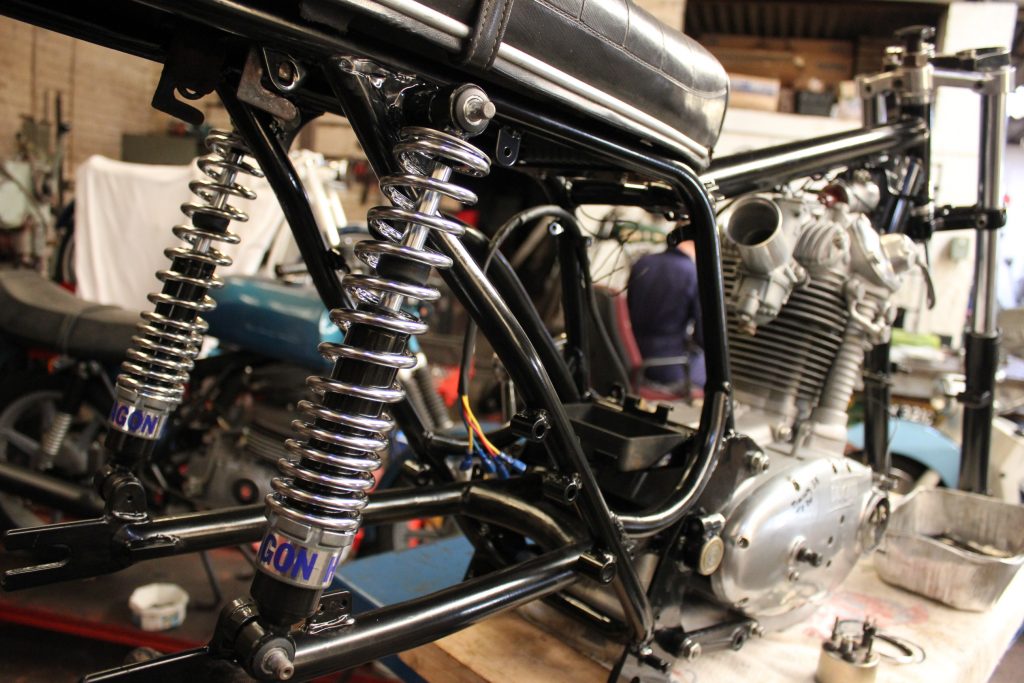
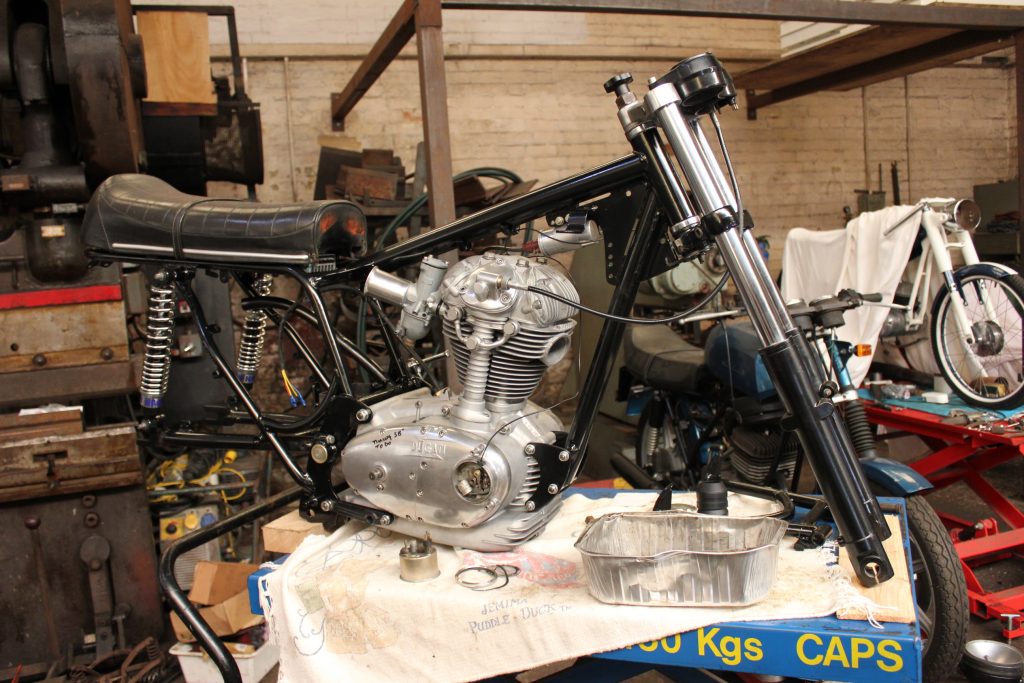
This is a nice Ducati that came to us for a check over and a service. The new owner had procured it for a very reasonable price or in my words a very cheap price. There are several anomalies that allow it to drift away from its true production form but they seem to accompany the engine and frame unit very well. These narrow case engines are unbustable and will happily rev out to 9,000RPM if they are built well as so few are nowadays, this particular engine had been contested over several years in the classic racing motorcycle club by a decent rider who decided to eventually build it up for road use.
The jelly mold petrol tank from an earlier model would have sported an amount of chrome plating on ether side of the tank. the new owner told me to check out the fiber glass petrol tank for leaks and to his glee I told him it was a steel one that had probably been silver painted due to chrome plating giving up the ghost or more usually to hide some dents, anyway I like it with it’s crazed silver paintwork .
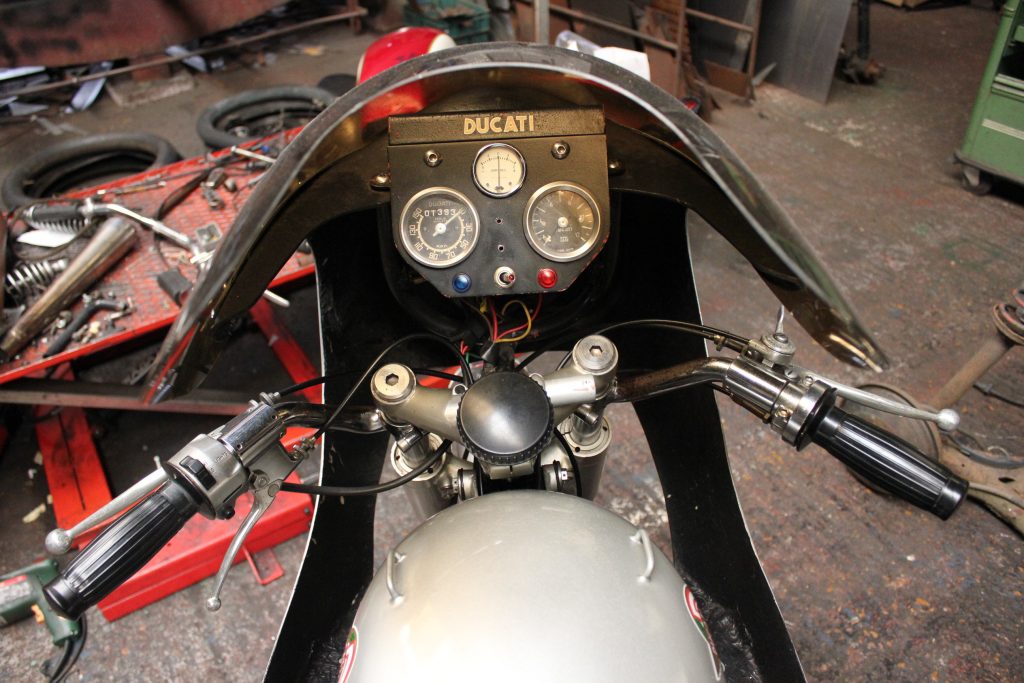
The seat unit looks a little thickset but is ideal for road use. The fairing is a little large but it has to be so as to contain the instrumentation and give good clearance for the handlebars. The headlight afore seems to be crying out for the Perspex cover that would have fitted on the front of the fairing giving a more wind stream effect. I don’t like the side panels as they are a little brick like in design, everything on this bike is very functional although a bit of a mongrel.
A home made wiring loom had been fitted and something on usage kept blowing 2 fuses in the fuse box when any lighting was employed. The problem was traced down to bad earth connections and a couple of shorted wires. A home made tail light mounting plate was a bad earth connection as some flue was used in constructing it. Creating intermittent earth connection. The tail light bulb wiring was also shorting out in the bulb holder. Electrical faults are always time consuming to track down particularly if it’s a custom loom even though the owner had provided a good wiring diagram.
Starting the engine that requires a certain knack in getting the crankshaft just over TDC on the compression stroke. This particular engine is inclined to flood and may blow the odd flame out of the carb bell mouth if you get your kick starting wrong you may find that the engine will lock up on the compression stroke due to its high compression. You may want to use an amount of judicious use of the exhaust valve lifter to help with starting. When the engine starts its raucous note emanates from its open megaphone. It definitely isn’t the loudest tone but it does let the hard of hearing pedestrian know you are in the vicinity. The sound is lovely.
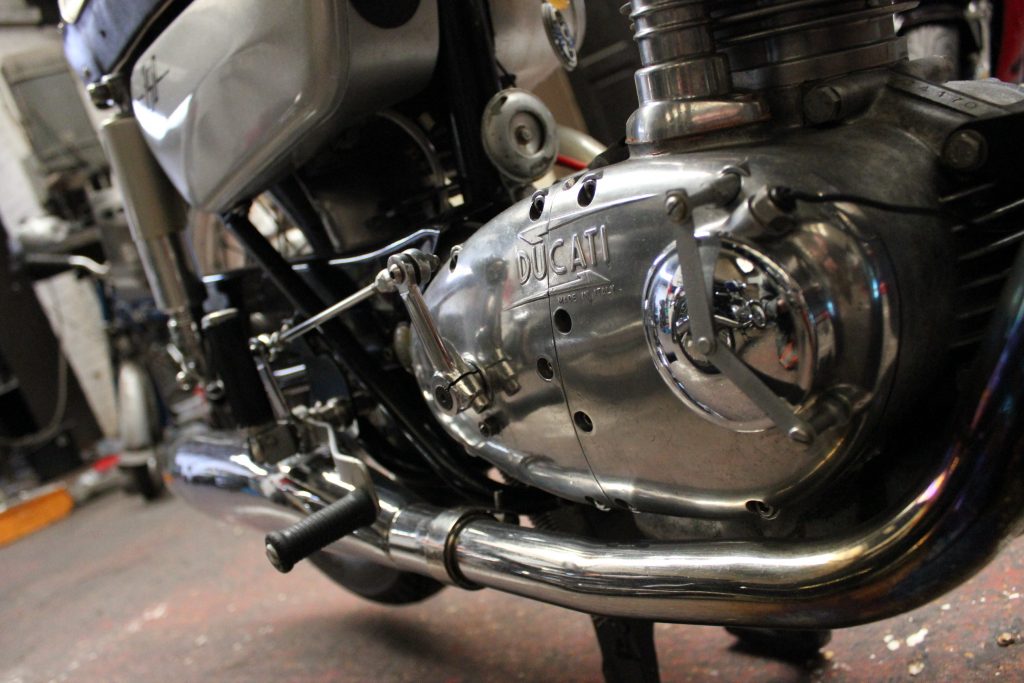
Out of interest I though I would remove the top end of the engine as so much can be learnt about the builder. On removal of the whole top end which is very easy as long as the crank isn’t turned over when the head is off as it will screw the valve timing up. It was found that the bottom bevels were a little on the tight side with zero clearance. I though the easiest way of dealing with this problem was to swap one of the shims behind the crank bevel to give the correct .0002 tenths of an inch clearance on the tightest bevel tooth. I inspected the barrel and the ring gaps and they were in perfect condition as well as the camshaft and followers, obviously a good builder. When checking the bottom bevels it is prudent to check if there is any end float on the crankshaft, this can easily be done without stripping the bottom end. If there is undue end float you will have to shim the crankshaft ends, if you don’t you will have the bottom bevels out. Unfortunately crank shimming is only possible if the engine is removed from the frame and striped down, watch out for those shims I put the top end back on and was satisfied that all was well.
Another start up by bump starting in second gear as I do when I rev mine and she starts up with no problem. I’m not used to kick starting small Dukes as I fear damaging as already damaged right ankle. All in all, the owner has bought well as I would be proud to be its new owner if ever he cares to part with it. There are a few amendments that I would make to the Ducati, I would lower the compression ratio so as to give less embarrassing start ups. The ignition timing is good at 36 to 37 degrees before top dead centre. I would defiantly put the nose cone as it will keep any rain out of the electrics behind the fairing. Some slight carb adjustments would be a good idea after lowering the compression ratio. Floppy kick starters can be a prob. I would ditch the side panels and fit something else to match the tank. I suppose that’s it.

A RD 500 Yamaha RD 500 YPV5 1984 Bought years ago as new it was ridden and laid up for many years until the lady owner decided to resurrect the machine to working order again and feel its exhilarating performance. The carbs came to us for restoration first and when these were finished the lady owner asked us if we could put the rest of the bike into its former running condition. She said the engine had been checked out and that it had been fitted into its chassis.
The bike was delivered As a rolling chasses and promptly delivered with loads of parts that needed fitting although the wiring loom had been loosely fitted although the loom seemed to duck and dive in between bits that it shouldn’t do. The wiring isn’t such a night mare as there is lots of Hitachi type plugs that are not interchangeable will only plug into its mating part. Cable routing is imperative whether it be electrical or control cables. If you map out the control cables wrongly, you will find that they operate heavily and if you lay the electrical cables in the wrong place you will find yourself battling with wiring, trying to reach the components that they need to plug into.
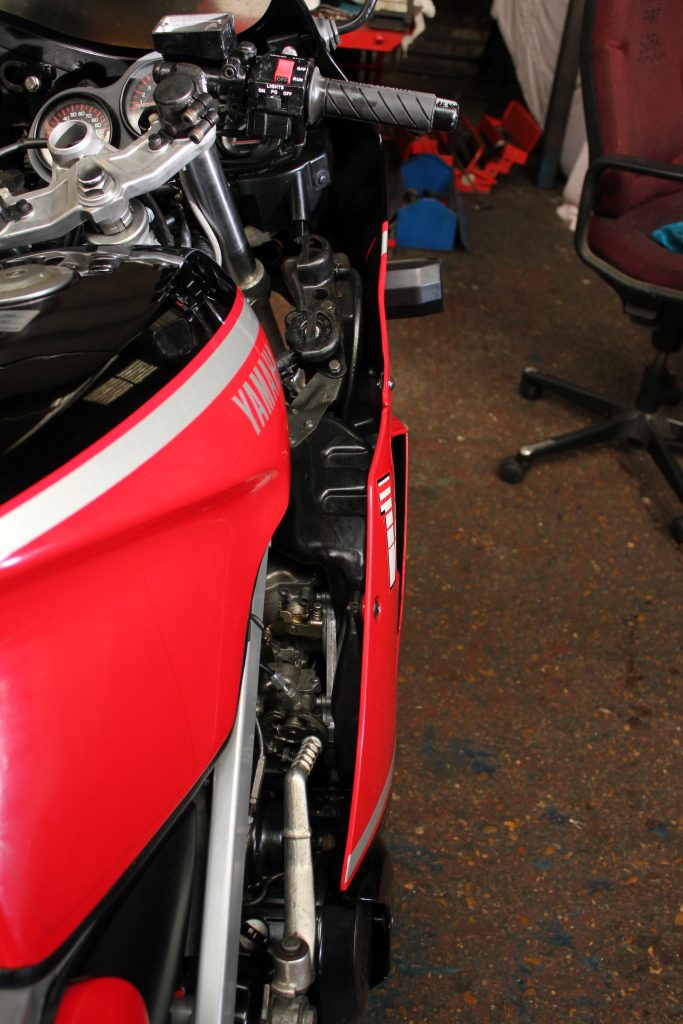
I thought that my Honda VF500 was a bit of a battle to get all the cabling routed properly but the RD 500 is a little but more intolerant to any deviation from what the workshop manual says. Care full reading of the manual is essential to stop you back tracking to find out what has gone wrong and leading you into lengthily rectifications. Everything fits very tightly around the engine area as well as a host of lubrication tubes. The official Yamaha workshop manual is not an ideal pictorial piece of work to aid you in fitting all of the lube tubes or fuel tubes so some background on working on one of these machines is essential or a good degree of common sense in lubricant systems and coolant workings. There is on particular fuel feed pipe that bridges the right hand bank of carbs with left hand bank, If you take the simple routing for this you will find that the pipe is about 20mm too short if you rout the pipe behind the two thick water pipes at the front of the engine you will find it would fit exactly.
Such parts as helmet lock and horn placement seem to be overlooked in a descriptive way but a very good look at the picture in the manual may give you give you a hint, its a bit like “Whereswally”. The battery cover is a rascal to fit as there is a microscopic amount of clearance to get it on. I have picked up on all the difficult parts to fit as there wouldn’t be much interest in reading about how I mounted the side panels for instance. All the other parts are easy to fit including the close fitting exhaust. There is a lot going on around the hot exhaust so watch that wire routing. All in all this Yamaha is an attractive bike and they fetch very good money but they are expensive to restore but becomes a bit easier and a little bit more tolerant to slight rerouting as you work onto the rear end of the bike but be careful.
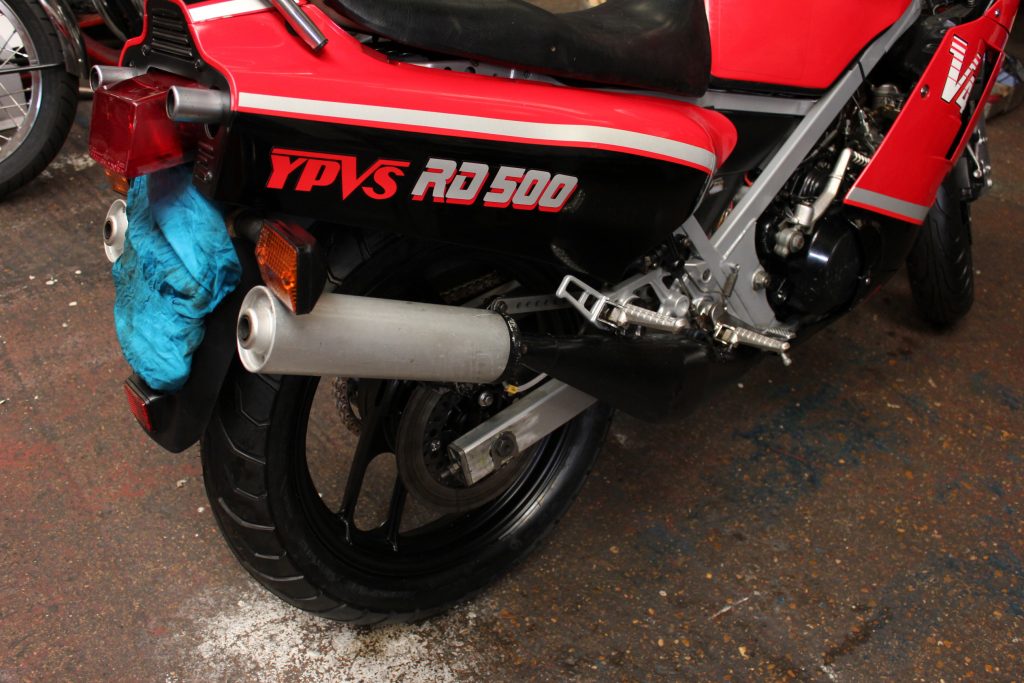
These bikes are good for 135MPH with 85BHP to back its punchy performance up. Based on the back of an array of race development bikes that performed admirably on the circuits at home and abroad the Yamaha RD500 per CC performed very well and was pitched to the ever awaiting public to get a flavour of its power on the road scene. Yamaha capitalised on the “RD” logo and produced an array of different CC bikes for the highway all around the world. They never disappointed the buyer as I was one of them owning an RD 350LC that I bought from a rag dealer not far from where I lived for £10 and it was a runner but was marked out for a theft in the near future so as to not let me get the full flavor of what it had to give.
I had to listen to all my mates say how good there Yams were. I never bothered with Yams as they were so stealable so I settled with stripped down Cespas and Lambos and cowed in the future to procure an RD of any size. I’ve worked on loads but one never came my way. The YPVS system on the 500s work really well although a little unorthodox in my mind but here is to experimentation and leading the way ahead with developmental design.
The frame had been silver powder coated as were he wheel rims and the engine was fitted although the arterial water cooling pipes wanted hooking up to the radiator and expansion tank. Another bone of contention was the front brake master cylinder as it refused to allow me to bleed the system even though I had fitted a new seal kit. I removed the seal kit and found that the seals where slightly different in size and there is a thin one way valve washer that sits behind the first seal to enter the master cylinder bore that was bent. Beware some of these kits as they can lead you up the wrong track. I installed a modern Triumph master cylinder and bled the front brakes in 2 minuets. The rear master cylinder was also suspect so I found a new one in the of parts supplied by the owner but it was different so I purged some parts off the old one and installed them on the new one but I retained all the internal working parts. This done and the break bled easily.
The clutch cable goes into a magnesium casing that can be removed or fitted with the full fairing installed as one may need to change the primary sprocket. The clutch cable is easily routed back to the control lever. The final drive chain is an “O” ring one and link less also would be adjusted to give 15mm slack. The primary sprocket although a little rusty was left in situ as the lock washer wouldn’t take any more folding up on its edges to lock the nut. A new sprocket was supplied by the owner but no locking washer even though the old sprocket showed no wear.
The fairings were fitted with the correct chrome plated dome head screws with the plastic washers behind there heads. If fairing screws are fitted without the plastic washers high pitch vibration will cause the screws to bed into the fairings, after some usage of the machine you will find white powder around the screw heads. Wind screen plastic screws always go hard and brittle after about ten years, you will never be able to tighten them up to the correct torque without them breaking. The front indicators after fitting the fairing are a bugger to fit unless you’ve got “ET” s fingers. I would love to see the build sequence in the Yamaha factory as I would guess a restorer would be way out. Beware of all i report as your project will probably be expensive and will take a lot of thought. This one is not for the beginners.

Ducati 350
My favorite vertically split engine to work on is the single cylinder Ducati. Horizontally spit engine are ideal but not so challenging. As usual separate components have to be set up in the crankcases and checked for end float, there’s no getting away with the procedure if you want a sweet engine that doesn’t miss gears and behaves its self for a very long time.
The 250 and 350 Ducati motors are the choice of the classic racing enthusiast as there are big steps that can be made in performance with moderate tuning. Due to a strong Ducati racing brigade in situ this has kept the suppliers of good aftermarket parts in buoyancy providing some hot parts that will tune your duke to todays classic racing winning recipes what I’m saying is, what’s on the market for classic racing Ducati’s available due to the Duke being the classic bike of choice albeit in the UK.
I race my bikes over the channel in Holland now but I will save this bit of info for a later blog. The Ducati came to me with a budget attached to it on the restoration costs. The only thing I could do is give the owner my painters details as well as my chrome plater the only problem is it’s not going to save him any dosh as he has to do the running around delivering and picking parts up. If I was to take his frame to the painters it would go with at least a couple of other customers frames and I would get discount on volume. Hence saving the customer some money. Chrome plating is what it is, costly and slow and with very little mark up on my part other than getting a little financial bonus on getting it done fast. At the end of the day when your restoring a bike you shouldn’t be put off if your the restoration company to divulge your supplier base as your supplier is going to be instructed via a letter from your company that you have appointed them to carry out mister blogs paint work, the only discount that will be met is off the back of what was supplied the painting, company with in the past.
The cost is in the donkey work IE; Putting it together properly with no bodges my customer got his frame shotblasted and primed and powder coated. I have yet to find an original Ducati frame and components, “primed”. Frames that are primed prior to powder coating usually attract 60 percent addition on costs. The chrome plating that I give out is done by a friends neighbor who owns a chrome plating company who is VAT registered, all I can so is push his chroming through the fastest I can like everyone else. “So no savings here” I thought it a good practical test on my behalf to see if the customer would save any hard earned pennies as I’m sure he cannot as I do not mark up costs on work that I have not carried out.
A big saving was in restoring the speedo and rev counter as I do them at home on the kitchen table with all my tools listening to the radio and it is done as a challenge in my own time. And I achieve perfection. The donkey work ensues with clearing out the primer and paint from the swinging arm bushes that hadn’t been masked. If it was me they would have been blanked off with a wood turned bung. Primer is a bugger to remove. Prior to putting the finished engine back into its frame you will have to clean all the bolt holes in the front mounting brackets and the rear engine mounts with a good sizes reamer or drill but as the bolts are a close fit in the holes and will not fit easily and will leave you struggling with the aid of a hammer.
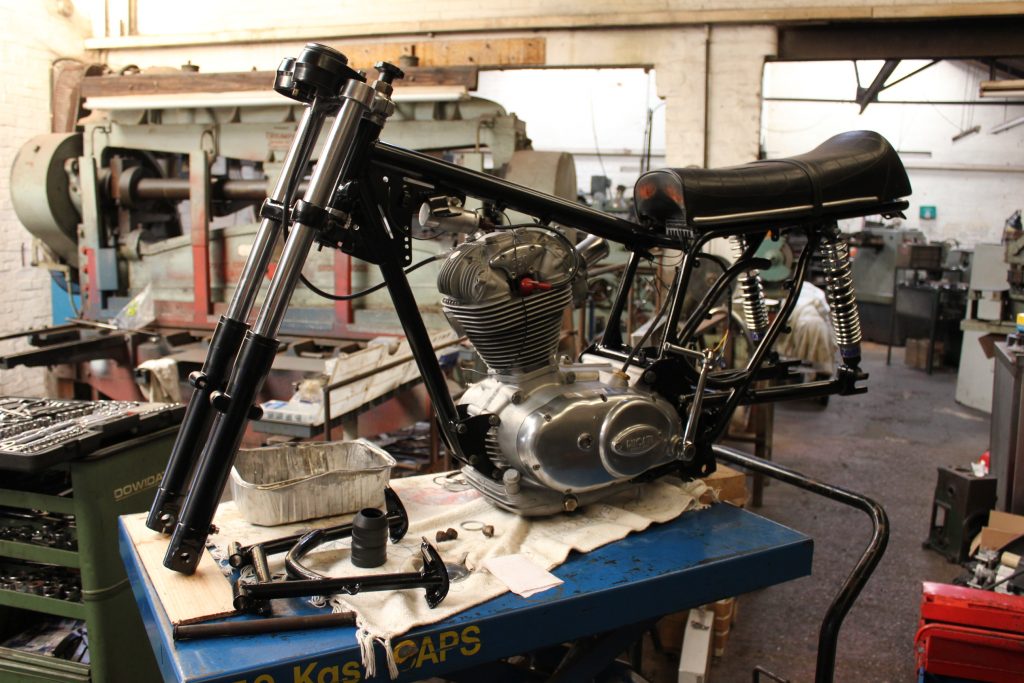
Don’t forget to use plenty of grease when putting stuff together. prior to settling the engine in its place it is best to get the forks, yolks and steering damper fitted as the frame will sit quite happily with a piece of wood slotted under a rear down tube bracket just behind the rear engine mounts. I also use a ratchet strap to hold the frame firmly as it makes less of a wrestle for getting the engine linked up to it’s rear mounts.
The engine is now in the frame and I have just fitted the rear Hagon shocks that the owner took a bit of time getting but I wasn’t going to let anything from holding me up. The seat ideally wants recovering but the owner though otherwise.
When running a restoration company you should have several projects in action at the same time and you will have to jump off of one project and onto another so you can fullfill a good solid day of work instead of waiting for the paint to dry. In my business we are always solidly booked up but we won’t turn a job away no matter how small, it just means we will have to put more hours into the day.
The LE Velocette found itself in the workshop after a phone call explaining that the chap who he was sharing the rebuild with had passed away and he held the knowledge on how to put it all back together. I was saddled with the job of putting it all back in an orderly usable fashion with very little information. without being armed with a workshop manual which is almost useless if I had one. The manual was of some use in as much as it told me to build the engine up to the rad and footboards and then lower the body on top of the rebuil, vertically aligning all of the mounting holes. This wasn’t particularly difficult to do but it cannot be carried out by yourself unless you want some scrapes to the paintwork.
I employed the info supplied in the spares book to put it back together as there is so much text in the service manual and it doesn’t cover all parts. When you have got the shell mounted to the engine mounting bracket and such, you will find it tricky to work on anything else excluding the canopy as there is limited space unless you have a finger like “ET” to hold a nut and washer inside the shell while with the other hand holding a socket driver or screw driver.
Make sure you know how to build one of these Velos, if not the best port of call would be from a previous restorer/owner or me. the spares manual will only give you an indication of where parts go but it will have to go together, Haynes manuals with there pictorial wealth do not cover Velocette LE or other uncommon models. So you will have to wing it sometime and fall on some ones mechanical sense on how it goes together.
I put the cables in last and ended up wrestling the control cables into place it isn’t to tyre some but attention will have to be paid in there routing. The wiring harness is a different matter as it is difficult to fit and route.
I feel I have to give the under powder and undersized engine a little bit of a slating even though it drew an amount of respect when an officer of the law was using the machine, how Velocette pulled this off, I don’t know! As from comments from past owners it couldn’t pull the skin off a rice pudding. It definitely wasn’t built to be a work hours but trust a steed to uphold the traffic laws. The steed was chosen for its wealth of panelling that could take a radio and a lot of flashing lights and a packed lunch in the seat in a flop top compartment.
The LE found favour in the Australian states and New Zealand and South Africa so it obviously made a global statement off its own back rather than what the Velocette sales man had to sell. So somehow this little bike sold itself and had something special to give to the world wide market. Reliability was its strength and it was comparatively comfortable to what was on offer in the day. Although there wasn’t much else on the market to compete with Velo adjustable rear suspension.
A mate of mine came to the factory and noticed the partially built velo in light blue and off white paintwork with a little chrome and a pinch of black pin striping this differentiates the pale shades, he told me a story “As part of the tonup crew “popular racers and musicians” numbering 8 in the day, on a summers evenings they could be seen hammering down so and so road breaking all the road regulations, he was spotted by a copper on his Noddy bike who intern waved them down, having stopped at a suitable safe place on the side of the road about a quarter of a mile down the road where he had spotted us, we waited for him to see what his verdict was going to be, He eventually pulled up behind the group and passed judgement and let us go with a warning “If I ever catch you again, you’ll be nicked ” he said, but to be more accurate he should have said “If you ever let me catch up to you again, you’ll be nicked”. The bikes earned there name from the situation that a higher ranking officer would be met by a noddy bike copper astride his velo “LE” with gauntlets fitted to his mitts, when passing a higher ranking offices the rider was to give a nod rather than a catastrophic solute. this is where the LE gets a tribe of followers from, breading off the memories of the past as I can’t see anybody younger than 50 holding an affinity with the “LE”” .
I would love to know the build sequence or to see something written in stone on how to do a rebuild so as to make it a less daunting subject for a learner to undertake and lose heart and bruise his or hers ventures on the project or future project, the restoration is not for the learner as your better off getting a Honda CB 125 or some other Jap single to stand you in good stead for the future. Cables in the correct positions and the wiring harness knitted into the underbelly of the bikes canopy and all the switches in position and plugged into the wiring loom ready for testing.
“WOW” The horn works and yes the tail camp works but not the stop lamp, check bulb “Ok”, Check wiring “Ok”, check continuity through break light switch “Ok”. Turn ignition on and all lights work including break light. The owner says everything is there, all nuts, bolt, washers. No points plate, no condenser, no battery cover, no clear tail light number plate illuminator plastic. There are not major parts but the contact breaker set is a bit tricky as all suppliers seem to be sold out but Hawkshaw motorcycles seemed to have one in stock.
On inspection of the engine I noticed that the usual oil pressure adjuster that was designed and fitter in the 1920 for Velos was still here on this machine. Why oh why have we come this far to find that manual settings of oil pressure is or should be out of the window or the trash, If you can carry out a restoration on any Velocette I think you are competent to work easily on any Japanese or Italian engine with easy. Velo engines will stand you in good stead for the ease of working on anything else. Velo engines and all there idiosyncrasies make you see how invaluable it is. Don’t get me wrong, I love working on Velos as I have the long term, built up, knowledge and I know how to make them work and perform to there best.
Copyright © 2020 Stotfold Engineering Company Limited. All rights reserved.